Welcome to this tutorial...
This guide explains how to build a complete Weather Application using modern Linux development tools:
- Rust
- GTK4
- Libadwaita
- Flatpak
The goal of this tutorial is to help new developers understand how modern Linux applications are structured, built, and distributed.
Overview
In this tutorial, you will create a fully functional graphical application that:
- Displays current weather information
- Shows a 7-day forecast
- Allows users to search for cities
- Saves selected cities locally
- Uses a responsive user interface
- Fetches data from a public web API
- Runs safely using background threads
- Is packaged and distributed using Flatpak
The application will follow current best practices for GTK4 and Libadwaita development.
Purpose of This Guide
Developing applications for Linux can initially feel complex. Developers often need to understand:
- System dependencies
- GUI frameworks
- Runtime environments
- Sandboxed packaging systems
- Version compatibility
This guide provides a structured path through these topics.
It begins with a completely empty system and builds the application step by step. Each concept is introduced when needed and explained in context.
The intention is not only to provide working code, but to explain:
- Why each component is necessary
- How the different tools interact
- What common errors mean
- How to debug problems effectively
Structure of This Tutorial
This documentation is divided into logical sections:
- Environment Setup
- Creating the Project
- Building the User Interface
- Adding Application Logic
- Fetching and Displaying Data
- Threading and Concurrency
- Data Persistence
- Debugging and Common Errors
- Flatpak Packaging
Each section builds upon the previous one.
You are encouraged to follow the chapters in order.
Audience
This tutorial is designed for developers who want to learn how modern Linux applications are built using Rust, GTK4, Libadwaita, and Flatpak.
It is especially suitable for:
- Students learning Linux application development
- Developers who know basic Rust and want to build graphical applications
- Developers new to GTK4 and Libadwaita
- Developers interested in Flatpak packaging and sandboxing
- Anyone curious about how desktop and mobile-ready Linux apps are structured
Required Knowledge
To follow this tutorial comfortably, you should have:
- Basic understanding of Rust syntax
(variables, functions, structs, simple error handling) - Basic familiarity with the terminal
(running commands, navigating directories) - A willingness to experiment and debug
We will explain all GTK, Flatpak, and architecture concepts from the beginning.
No Prior Experience Required
You do not need:
- Previous GTK experience
- Knowledge of Libadwaita
- Mobile development experience
- Experience with Flatpak
- Knowledge of Linux packaging systems
All required tools and concepts will be introduced step by step.
What Kind of Learner Is This For?
This guide is ideal if you:
- Prefer structured, step-by-step instructions
- Want to understand why something works not just copy code
- Are comfortable reading documentation
- Want to build a real application instead of a minimal example
The tutorial focuses on clarity and gradual learning.
Development Environment Assumptions
This tutorial assumes you are working on:
- A Linux system (Debian or similar)
- A clean or newly prepared development environment
- A system where you can install packages and run development tools
All setup steps are explained in the Environment Setup section.
How to Use This Tutorial
This sections explains how to work through this guide effectively. While you can read individual sections independently, this tutorial is designed to be followed in order.
Recommended Reading Order
The tutorial is structured progressively:
- Environment Setup
- Project Creation
- User Interface Design
- Application Logic
- API Integration
- Threading and Concurrency
- Local Data Storage
- Debugging
- Flatpak Packaging
Each section builds on knowledge from the previous one.
For best results, follow the chapters sequentially.
Estimated Time Commitment
This tutorial is designed to be completed in approximately:
- 8–10 hours total
or - 2–3 focused sessions
Time may vary depending on:
- Your familiarity with Rust
- Your Linux experience
- Whether you explore additional experiments
Do not rush. The goal is understanding, not speed.
Development Setup Recommendation
It is strongly recommended to use:
- A clean Linux installation
or - A fresh virtual machine (VM)
Why?
Because this tutorial simulates the onboarding experience of a new developer starting from scratch.
Using a clean system ensures:
- You install all required dependencies yourself
- You see common setup issues
- You understand how the full environment works
If you already have Rust or GTK installed, that is fine but be aware that some steps may behave differently.
How to Follow Along
For each chapter:
- Read the explanation carefully.
- Type the commands manually (avoid copy-pasting everything).
- Run the application after each major step.
- Verify that your output matches the expected result.
- Only then continue to the next section.
Typing commands manually helps you understand what is happening.
Handling Errors
It is normal to encounter errors during development.
Common examples include:
- Missing system libraries
- Version mismatches
- Flatpak runtime issues
- GTK builder validation errors
- Network-related API errors
If something fails:
- Read the error message carefully.
- Compare your output with the documentation.
- Check the "Debugging and Common Errors" section.
- Search the official documentation if necessary.
Do not panic debugging is part of the learning process.
Experimentation Is Encouraged
You are encouraged to experiment during this tutorial.
For example:
- Change window sizes and observe layout behavior
- Modify labels and UI elements
- Try invalid city names
- Remove network permission in Flatpak and observe what happens
- Intentionally break something and fix it
Understanding how systems fail is just as important as understanding how they work.
Understanding the Structure
Each chapter typically includes:
- Concept explanation
- Code example
- Step-by-step instructions
- Expected output
- Notes about common pitfalls
Try to understand:
- Why each dependency is needed
- Why background threads are required
- Why Flatpak requires specific permissions
- Why certain GTK widgets are chosen
The goal is comprehension, not just completion.
When You Get Stuck
If you are stuck:
- Re-read the previous section
- Check that all dependencies are installed
- Verify your Cargo.toml versions
- Rebuild using
cargo clean - Rebuild Flatpak using
--force-clean
Sometimes rebuilding from scratch solves environment-related issues.
Final Advice Before You Begin
- Be patient.
- Take notes.
- Test frequently.
- Do not skip sections.
By the end of this tutorial, you will not only have a working application you will understand how modern Linux applications are built, structured, and distributed.
Continue to the next chapter to prepare your development environment.
VM Setup
Before we start installing Rust, GTK, or Flatpak, we need to prepare a clean development environment.
This tutorial assumes you are starting from a fresh Linux system.
The recommended approach is to use a Virtual Machine (VM).
What Is a Virtual Machine?
A Virtual Machine (VM) is a software-based computer that runs inside your real computer.
It allows you to:
- Install a fresh operating system
- Test development environments safely
- Avoid breaking your main system
- Reproduce a clean "first-time developer" setup
Think of it as a separate computer running inside your laptop.
Why Use a Virtual Machine?
Using a VM ensures that:
- No tools are preinstalled
- No hidden dependencies exist
- The setup process reflects a real onboarding experience
- All required packages are installed manually
- Errors are visible and reproducible
For learning and evaluation purposes, this is extremely important.
If you already have Rust and GTK installed globally, you may skip some setup steps but using a VM is strongly recommended.
Recommended Configuration
You can use any virtualization software such as:
- VirtualBox
- GNOME Boxes
- VMware
For this tutorial, the recommended configuration is:
- Operating System: Debian 13
- RAM: 4 GB (minimum 2 GB)
- Disk Space: 20 GB
- CPU: 2 cores (recommended)
These values provide enough resources to build Rust projects and Flatpak packages comfortably.
Step 1 - Install a Linux Distribution
Download one platform :
- Debian (stable)
Install the operating system inside your VM.
During installation:
- Enable standard utilities
- Enable network access
- Create a user account with sudo privileges
Once installation is complete, log in to your new system.
Step 2 - Update the System
Before installing development tools, update your system:
sudo apt update
sudo apt upgrade -y
Step 3 - Install Basic Development Tools
Install essential build tools:
sudo apt install build-essential curl git pkg-config -y
Step 4 - Verify Network Access
Since this tutorial fetches data from an online API, verify that your system has internet access:
ping google.com
If this works, your network is configured correctly.
Optional - Install a Code Editor
You may use any editor, such as:
- VS Code
- GNOME Builder
- Vim
- Nano
For beginners, VS Code is often the most comfortable choice.
Example installation:
sudo snap install code --classic
install from your distribution’s package manager.
Install Rust
Rust is the programming language we will use to build our Weather Application.
- Install Rust using the official installer
- Verify that the installation works
- Understand what Cargo is
- Confirm your development environment is ready
What Is Rust?
Rust is a modern systems programming language focused on:
- Performance
- Memory safety
- Concurrency
- Reliability
Rust is widely used for:
- Command-line tools
- Backend services
- WebAssembly
- Desktop applications (including GTK apps)
We will use Rust together with GTK4 and Libadwaita to build a graphical application.
Step 1 - Install Rust Using rustup
Rust is installed using rustup, the official Rust toolchain installer.
Run the following command:
curl https://sh.rustup.rs -sSf | sh
You will see a message explaining installation options.
When prompted, select:
1) Proceed with installation (default)
Press Enter.
The installer will:
- Download the Rust compiler
- Install Cargo (Rust’s package manager)
- Configure your environment
This may take a few minutes.
Step 2 - Configure Your Environment
After installation completes, you may see a message like:
To get started you may need to restart your current shell.
Run:
source $HOME/.cargo/env
This ensures the Rust tools are available in your terminal session.
Step 3 - Verify Installation
Check that Rust and Cargo is installed correctly:
rustc --version
cargo --version
If both commands work, Rust is installed successfully.
What Is Cargo?
Cargo is Rust’s:
- Build system
- Package manager
- Dependency manager
- Project generator
You will use Cargo to:
- Create new projects
- Add dependencies
- Compile your application
- Run your application
Think of Cargo as the central tool for Rust development.
Step 4 - Create a Test Project (Optional but Recommended)
To confirm everything works, create a simple test project:
cargo new rust_test
cd rust_test
cargo run
You should see:
Hello, world!
cd ..
rm -rf rust_test
Common Issues and Solutions
Command Not Found: rustc or cargo
If you see:
command not found: rustc
Run:
source $HOME/.cargo/env
If the issue persists, restart your terminal.
curl Not Found
If curl is missing, install it:
sudo apt install curl -y
Permission Errors
Do not use sudo to install Rust with rustup.
Rust should be installed as a normal user.
Why We Use rustup
Rustup allows:
- Managing multiple Rust versions
- Updating Rust easily
- Installing additional components
- Keeping your system organized
To update Rust later, simply run:
rustup update
for more details go through the Rust Documentation
Install GTK4 and Libadwaita
Now that Rust is installed, we need to install the graphical libraries required to build GTK applications.
Rust alone is not enough to build a graphical interface. GTK applications depend on system libraries that must be installed separately.
In this chapter, you will:
- Install GTK4 development libraries
- Install Libadwaita
- Install required system tools
- Verify that the setup works
What Are GTK4 and Libadwaita?
GTK4
GTK (GIMP Toolkit) is a cross-platform library for building graphical user interfaces.
GTK4 is the modern version used for:
- Linux desktop applications
- GNOME applications
- Mobile-adaptive applications
It provides widgets such as:
- Windows
- Buttons
- Labels
- List views
- Layout containers
Libadwaita
Libadwaita is a companion library built on top of GTK4.
It provides:
- Modern GNOME design components
- Responsive layout tools
- Adaptive UI behavior
- Navigation patterns for desktop and mobile
In this tutorial, we will use Libadwaita to create a modern, responsive interface.
Why System Libraries Are Required
When you add this dependency in Cargo.toml:
gtk4 = "0.9"
Rust does not download GTK itself.
Instead:
- The Rust crate connects to system-installed GTK libraries.
- The system must already provide GTK development headers.
If GTK is not installed, you will see build errors like:
pkg-config not found
gtk4 not found
That is why this step is required.
Step 1 - Install GTK4 Development Packages
Run:
sudo apt install libgtk-4-dev -y
This installs:
- GTK4 runtime libraries
- Development headers
- Required system components
Step 2 - Install Libadwaita Development Packages
Run:
sudo apt install libadwaita-1-dev -y
This installs:
- Libadwaita runtime
- Development headers
Step 3 - Install Additional Required Tools
Install pkg-config:
sudo apt install pkg-config -y
Install GLib development files:
sudo apt install libglib2.0-dev -y
These tools allow Rust to detect installed system libraries during compilation.
Step 4 - Verify Installation
You can verify GTK4 installation using:
pkg-config --modversion gtk4
You should see a version number such as:
Now verify Libadwaita:
pkg-config --modversion libadwaita-1
If both commands return version numbers, the installation was successful.
What If pkg-config Fails?
If you see:
Package gtk4 was not found
Make sure:
libgtk-4-devis installed- You ran
sudo apt update - Your distribution version supports GTK4
If you are using an older Linux distribution, GTK4 may not be available in default repositories.
Why This Step Is Important
GTK and Libadwaita are native libraries written in C.
Rust bindings rely on these native system components.
Without them:
- Your project will not compile
- Cargo will fail during build
- Flatpak builds may also fail
Installing these correctly ensures:
- Cargo can detect GTK
- Your application builds successfully
- Your development environment is complete
For more details can be found in Gtk and Libadwaita Documentation
Install Flatpak
In this chapter, you will install Flatpak and prepare the required runtime environment for building and running the application inside a sandbox.
Flatpak is an essential part of modern Linux application distribution.
What Is Flatpak?
Flatpak is a system for:
- Building applications
- Distributing applications
- Running applications in a sandbox
Unlike traditional package managers, Flatpak:
- Bundles application dependencies
- Runs looking at a defined runtime
- Is isolated from the host system
- Works across different Linux distributions
Flatpak ensures that your application runs consistently across systems.
Why We Use Flatpak in This Tutorial
In modern GNOME and LinuxMobile development:
- Applications are expected to be sandboxed
- Distribution often happens through Flathub
- Runtimes are standardized (e.g., GNOME Platform)
Using Flatpak allows you to:
- Reproduce builds reliably
- Avoid host system conflicts
- Test your application in a controlled environment
Step 1 - Install Flatpak
Run:
sudo apt install flatpak -y
Now verify installation:
flatpak --version
Step 2 - Add Flathub Repository
Flathub is the main Flatpak application repository.
Add it with:
flatpak remote-add --if-not-exists flathub \
https://flathub.org/repo/flathub.flatpakrepo
This allows your system to download runtimes and SDKs.
Step 3 - Install GNOME Runtime
Our project uses:
- GNOME Platform
- GNOME SDK
- Version 49
Install the runtime:
flatpak install flathub org.gnome.Platform//49
Install the SDK:
flatpak install flathub org.gnome.Sdk//49
The runtime provides:
- GTK libraries
- System dependencies
- Shared components
The SDK provides:
- Development tools
- Build utilities
- Compilation support
Step 4 - Install Rust SDK Extension
Since we are building a Rust application, we must install the Rust extension for the GNOME SDK.
Run:
flatpak install flathub org.freedesktop.Sdk.Extension.rust-stable
After running this command, Flatpak will show a list of available versions.
It will look similar to this:
Looking for matches...

1) runtime/org.freedesktop.Sdk.Extension.rust-stable/x86_64/21.08
2) runtime/org.freedesktop.Sdk.Extension.rust-stable/x86_64/1.6
3) runtime/org.freedesktop.Sdk.Extension.rust-stable/x86_64/22.08
4) runtime/org.freedesktop.Sdk.Extension.rust-stable/x86_64/23.08
5) runtime/org.freedesktop.Sdk.Extension.rust-stable/x86_64/18.08
6) runtime/org.freedesktop.Sdk.Extension.rust-stable/x86_64/24.08
7) runtime/org.freedesktop.Sdk.Extension.rust-stable/x86_64/19.08
8) runtime/org.freedesktop.Sdk.Extension.rust-stable/x86_64/25.08
9) runtime/org.freedesktop.Sdk.Extension.rust-stable/x86_64/20.08
Flatpak will then ask:
Which do you want to use (0 to abort)? [0-9]:
What should you type?
Type:
8
and press Enter.
The number 8 selects the latest stable Rust SDK version (25.08). Using the newest version ensures compatibility with the latest GNOME SDK and Rust tooling.
After selecting the number, Flatpak will start downloading the Rust toolchain.
You will see something like:
Installing...
22% 1.5 MB/s
Wait until the installation finishes.
This extension provides:
- Rust compiler inside the Flatpak build environment
- Cargo support
- Required toolchain integration
Without this extension, Flatpak builds will fail.
Step 5 - Verify Installed Runtimes
List installed runtimes:
flatpak list
You should see entries for:
- org.gnome.Platform 49
- org.gnome.Sdk 49
- org.freedesktop.Sdk.Extension.rust-stable
If they appear, your Flatpak environment is ready.
Understanding Runtime vs SDK
Runtime
The runtime is what your application runs on.
It contains:
- GTK
- System libraries
- Shared components
It ensures consistency across different Linux systems.
SDK
The SDK is used during build time.
It contains:
- Compilers
- Debug tools
- Headers
- Build environment tools
You build against the SDK. Users run against the runtime.
Why Flatpak Matters for Onboarding
Flatpak introduces additional complexity:
- Large runtime downloads
- Version alignment requirements
- Sandbox permissions
- Manifest configuration
Understanding these early helps you:
- Debug build errors
- Understand permission requirements
- Package applications correctly
Flatpak is not just a packaging tool it defines the application environment.
Common Issues and Solutions
Runtime Version Not Found
If you see:
Requested runtime not installed
Make sure you specify the correct version:
org.gnome.Platform//49
Check available versions:
flatpak search org.gnome.Platform
Rust Extension Version Mismatch
If you see:
Requested extension not installed
Install the rust-stable extension without specifying version:
flatpak install flathub org.freedesktop.Sdk.Extension.rust-stable
Disk Space Issues
Flatpak runtimes can consume several gigabytes.
If space is limited:
flatpak uninstall --unused
for more details go through the Flatpak Documentation
Understanding the Weather Application Structure
When building a GTK4 and Libadwaita application, we are not only writing code. We are designing a graphical interface made of different UI components called widgets.
Widgets are the visual elements that users interact with. Examples include buttons, text labels, lists, and layout containers.
In this Weather Application, every visible part of the interface is built using widgets from GTK4 and Libadwaita.
GTK4 provides the basic building blocks such as GTK Box, GTK Button, GTK Label, GTK ListBox, GTK Stack, and GTK Popover.
Libadwaita provides modern GNOME interface components such as HeaderBar, NavigationSplitView, StatusPage, ActionRow, MessageDialog, and Breakpoint.
Before learning each widget individually, it is helpful to first look at how the whole application is structured.
What the App Looks Like When It Starts
When the Weather Application runs for the first time, there are no cities saved yet. Because of this, the interface shows an empty state.
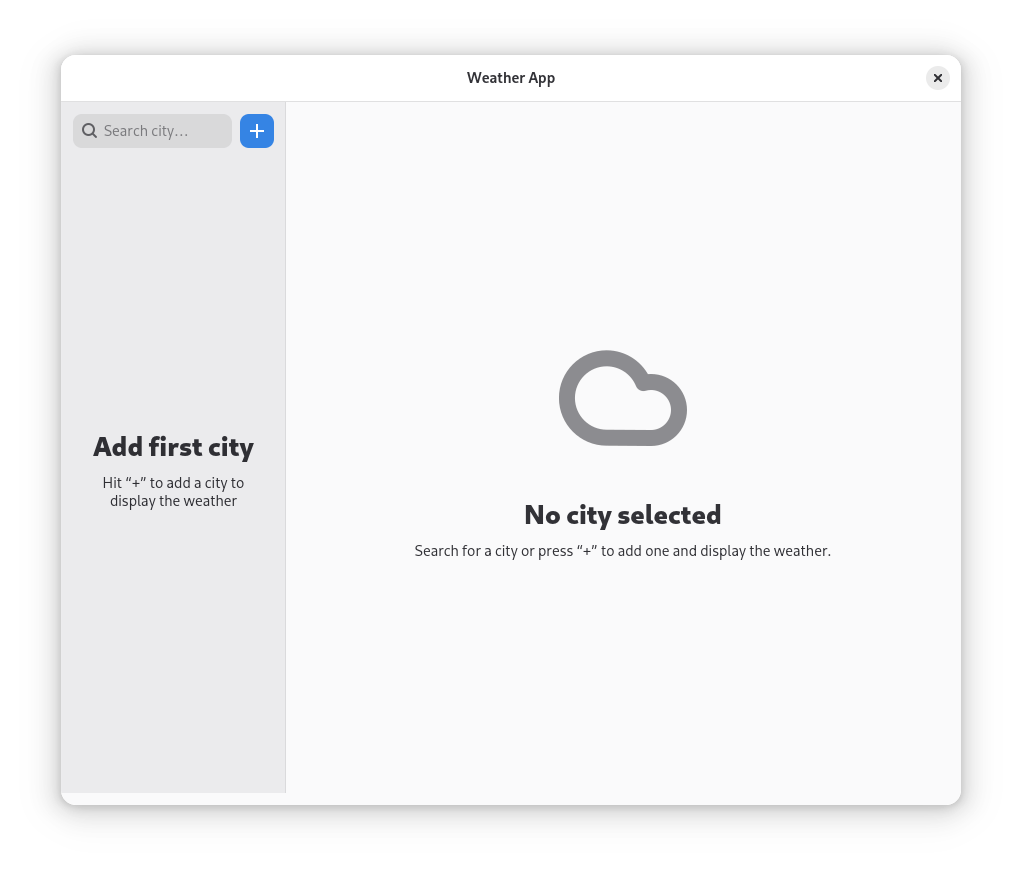
Figure 1 shows the application when it first opens.
At the top of the window, we can see the HeaderBar.
The HeaderBar replaces the traditional menu bar and gives the application a modern GNOME design.

Figure 6: HeaderBar showing the application title and navigation controls.
Inside the header bar, a GTK Label displays the title of the application, and GTK Button widgets provide navigation controls.
Below the header bar, the layout is divided using NavigationSplitView.
This widget creates two areas in the application: a left sidebar and a right content area.
Inside the sidebar, we use a vertical GTK Box to arrange elements from top to bottom.
At the top of this box, there is a GTK SearchEntry which allows users to search for cities.
Next to it, there is a GTK Button with a plus icon used to add a new city.
Since no city has been added yet, the sidebar displays a StatusPage.
The StatusPage is a Libadwaita widget used to show helpful messages when there is no data to display.
Instead of showing an empty area, it guides the user with a message such as “Add your first city.”
This design makes the application feel complete even when it contains no data yet.
What the App Looks Like After Adding a City
After a city is added and selected, the interface changes and shows the weather details.
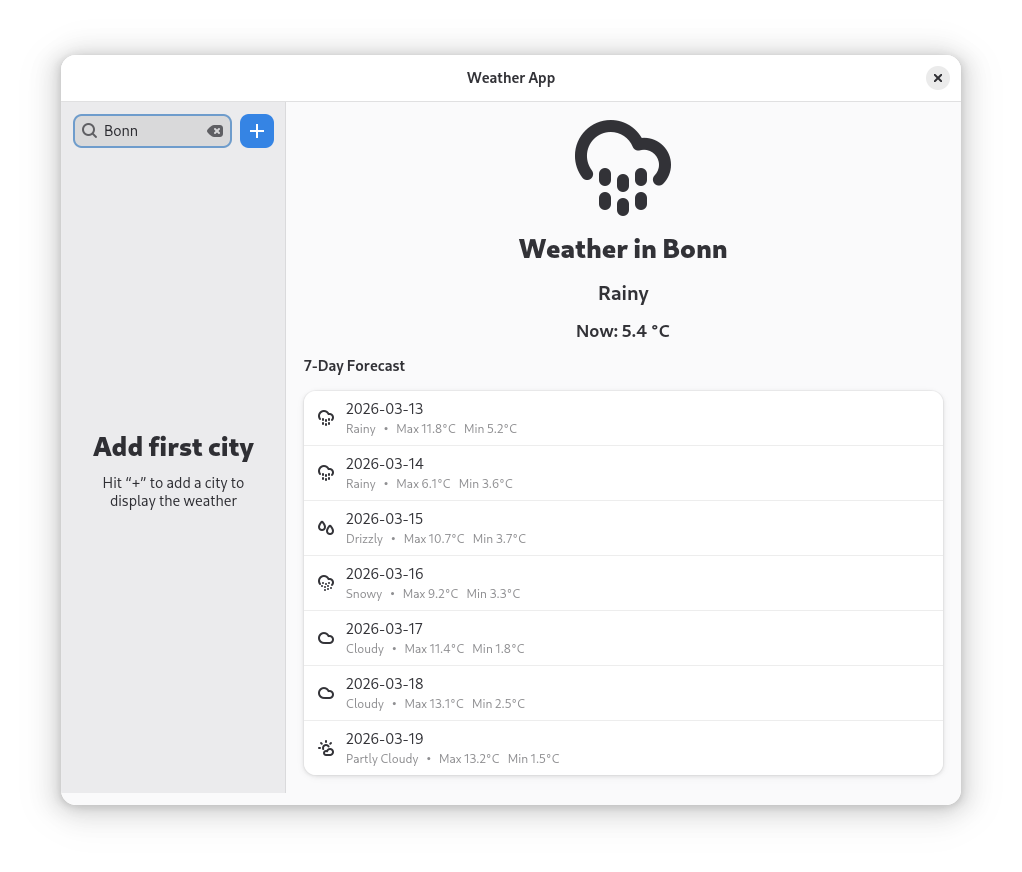
Figure 2 shows the application after a city has been added.
The NavigationSplitView now clearly divides the app into two working areas.
The left side displays the saved cities list.
The right side shows the weather information for the selected city.
The list of cities is displayed using GTK ListBox.
Each city is represented using an ActionRow.
ActionRow is a Libadwaita widget designed for list items that contain structured information.
Each row shows the city name and may include additional elements such as icons or buttons.
In this app, each row also includes a GTK Button with a trash icon that allows the user to delete the city.
On the right side of the window, the weather details are displayed.
This part of the interface is controlled by a GTK Stack.
A GTK Stack allows multiple views to exist in the same area but shows only one at a time.
When no city is selected, the stack shows an empty view. When a city is selected, it switches to the weather information view.
Inside the weather view, different widgets are used.
A GTK Image displays the weather icon.
GTK Label widgets display the city name and the current temperature.
Below this information, another GTK ListBox displays the 7-day weather forecast.
Each forecast entry is again displayed using an ActionRow.
This shows how widgets such as ListBox and ActionRow can be reused for different purposes within the same application.
The Main Controller of the Application
Every GTK application starts with an Application.
In Libadwaita applications, we use AdwApplication.
The Application is not visible to the user.
Instead, it controls how the program starts and how windows are managed.
It connects the application to the operating system and ensures that everything runs correctly.
You can think of the Application as the manager of the program.
It starts the application, keeps it running, and manages its windows.
Without an Application, the program would not be able to create any windows.
The Main Window of the Application
The first visible part of the program is the ApplicationWindow.
The ApplicationWindow acts as the main container for the entire interface.
It defines the size of the application and holds all other widgets.
At the top of the window, we place a HeaderBar.
The HeaderBar replaces the traditional menu bar and provides a modern GNOME-style top area.
Inside the header bar, we use:
GTK Buttonwidgets for navigation actions- A
GTK Labelto display the application title “Weather App”
A GTK Button is an interactive widget that performs an action when the user clicks it.
A GTK Label simply displays text on the screen.
Showing Messages to the User
Applications must guide users when something goes wrong.
In this Weather App, we use MessageDialog to show feedback messages.
MessageDialog is a Libadwaita dialog window that appears on top of the main application window.
For example, if the user tries to add a city without typing a name, the application shows a message explaining that the city name cannot be empty.
If the user tries to add a city that already exists, another dialog informs them that the city is already saved.
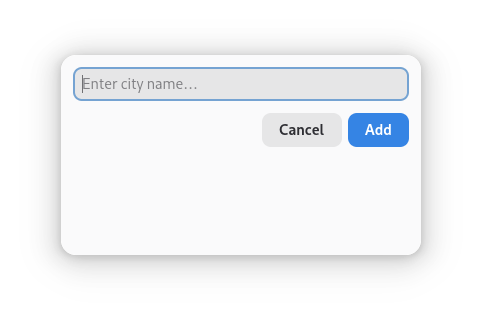
Figure: Dialog displayed when the user clicks the "+" button.
Dialogs temporarily block interaction with the main window until the user closes them. This ensures that important messages are noticed.
Dividing the Interface into Two Parts
To divide the window into a sidebar and a content area, the application uses NavigationSplitView.
NavigationSplitView is a Libadwaita widget that automatically creates a two-pane layout.
In this Weather App:
The left pane contains the city list and search tools.
The right pane displays the weather information.
On large screens, both panes are visible at the same time.
On smaller screens, the layout collapses so that only one pane is visible at a time.
This makes the application responsive and usable on different screen sizes.
Organizing the Sidebar Layout
Inside the sidebar, widgets are arranged using GTK Box.
A GTK Box is a layout container that arranges widgets either vertically or horizontally.
In the Weather App sidebar, we use a vertical box to place widgets one below another.
At the top of the sidebar, there is a horizontal box containing two elements:
A GTK SearchEntry, which allows users to type and search for cities.
A GTK Button with a plus icon, which opens the dialog for adding a new city.
Using boxes helps control spacing and alignment so that the interface looks clean and organized.
Handling the Empty Sidebar
When the application starts and no cities are saved, the sidebar would normally appear empty.
To improve the user experience, we use a StatusPage.
StatusPage is a Libadwaita widget designed to display helpful placeholder messages.
In this application, it shows a message encouraging the user to add their first city.
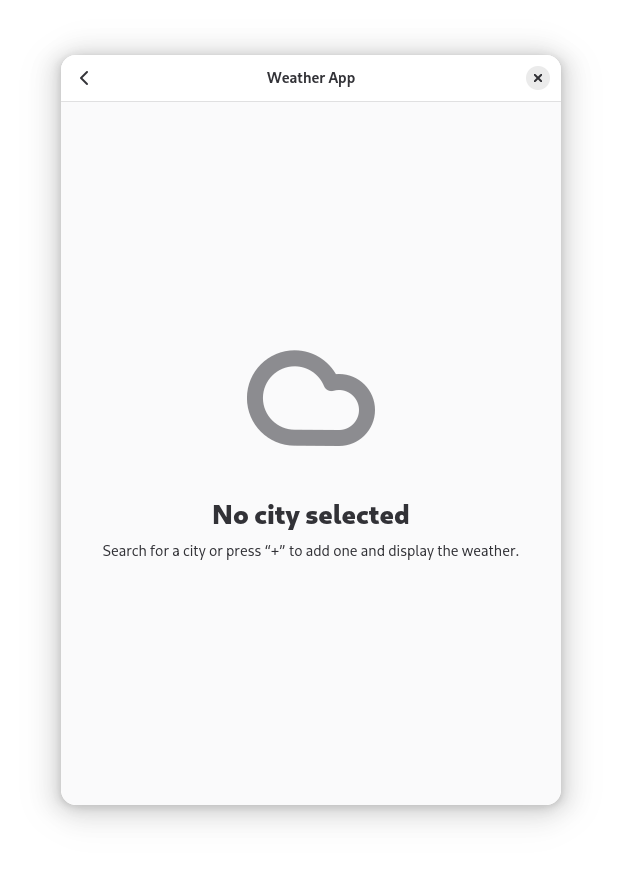
Figure: The application sidebar when no cities have been added yet.
This approach prevents the interface from looking incomplete.
Displaying the Saved Cities
The saved cities are displayed using GTK ListBox.
GTK ListBox is a container that organizes rows vertically.
Each city is displayed using an ActionRow.
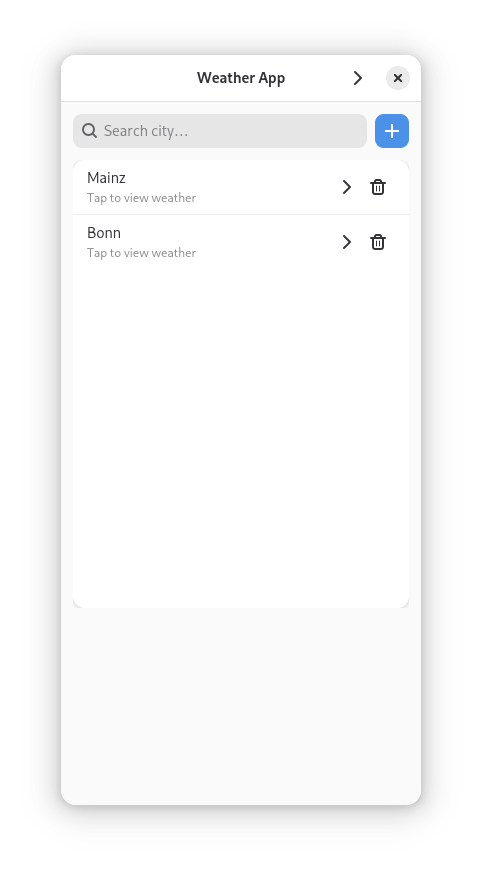
Figure: The sidebar displaying a saved city using a GTK ListBox and ActionRow.
An ActionRow usually contains:
A title (the city name)
Optional subtitle text
Optional icons or buttons
In this Weather App, each row also includes a delete button with a trash icon.
Because ActionRow follows GNOME design guidelines, it helps the application maintain a consistent and modern appearance.
Displaying Weather Information
The weather information is displayed in the right pane.
This area is controlled by a GTK Stack.
A GTK Stack allows multiple views to exist in the same area but only one is visible at a time.
The stack switches between:
An empty state view
The weather information view
Inside the weather view, several widgets are used.
GTK Label widgets display the city name and temperature.
A GTK Image shows the weather icon.
Below this information, a GTK ListBox displays the 7-day forecast.
Each forecast entry is displayed using an ActionRow.
Making the Interface Interactive
Widgets become interactive through signals.
Signals are events that occur when a user interacts with a widget.
For example, when a user clicks a GTK Button, the button emits a clicked signal.
The application then runs a function called a callback to respond to that event.
Examples in this application include:
Clicking the plus button opens the add city dialog.
Selecting a city row displays the weather information.
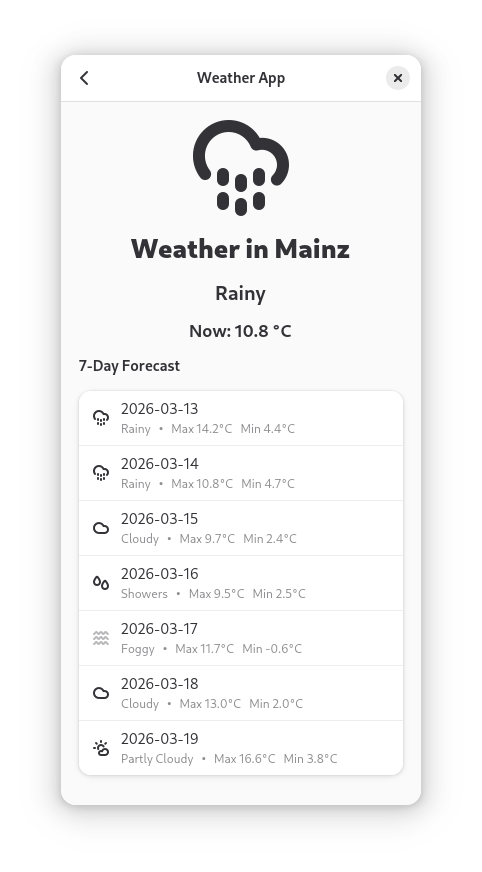
Figure: Navigation arrow allowing the user to move between the sidebar and the weather view.
Typing in the search field shows city suggestions.
Signals connect user actions with application behavior.
Showing City Suggestions
When the user types in the search field, the application displays city suggestions.
This is implemented using GTK Popover.
A GTK Popover is a floating container that appears near another widget.
In this case, the popover appears below the SearchEntry.
Inside the popover, we place a GTK ListBox containing suggestion rows.
This creates a dropdown-style list of possible cities.
Adapting the App to Different Screen Sizes
Modern applications must work on both large and small screens.
Libadwaita provides Breakpoint to support responsive design.
A breakpoint defines how the layout should change when the window becomes smaller.
In this Weather App:
When the window becomes narrow, the NavigationSplitView collapses.
Only one pane is visible at a time.
Navigation buttons allow the user to move between the sidebar and the weather view.
This ensures that the application works well on desktops, tablets, and small windows.
Understanding Cargo and Project Setup
In the previous chapter, we looked at the structure of the Weather Application and the widgets used to build the user interface.
Now we will learn about Cargo, the tool that manages Rust projects.
Cargo helps us build, run, and organize our application. It also manages external libraries that our project depends on.
Understanding Cargo will help you see how Rust code, GTK libraries, and external packages work together to create a complete application.
What Is Cargo?
Cargo is the official build tool and package manager for Rust.
It performs several important tasks for developers.
Cargo can:
- Create new Rust projects
- Download external libraries (called crates)
- Compile the program
- Run the application
- Manage project versions and dependencies
Instead of manually compiling many files, Cargo handles everything automatically.
When we run a command such as:
cargo run
Cargo first compiles the project and then runs the application.
Because of this, Cargo becomes the central tool used in almost every Rust project.
The Cargo.toml File
Every Rust project contains a configuration file called Cargo.toml.
This file tells Cargo important information about the project, such as:
- The project name
- The version of the application
- The Rust edition used
- The external libraries required by the project
Open the Cargo.toml file in the Weather App project.
You will see something similar to this:
[package]
name = "weatherapp"
version = "0.1.0"
edition = "2021"
build = "build.rs"

[dependencies]
gtk4 = "0.9"
libadwaita = { version = "0.7", features = ["v1_4"] }

reqwest = { version = "0.11", features = ["blocking", "json"] }
serde = { version = "1.0", features = ["derive"] }
urlencoding = "2.1"

[build-dependencies]
glib-build-tools = "0.18"
This file defines how the project is built and which libraries are used.
Project Information
The [package] section contains basic information about the project.
[package]
name = "weatherapp"
version = "0.1.0"
edition = "2021"
The name defines the name of the application.
Cargo will create an executable file with this name.
The version shows the current version of the project.
Version numbers become important when distributing applications.
The edition defines the Rust language version used by the project.
Using the 2021 edition enables modern Rust features.
Project Dependencies
The [dependencies] section lists external libraries used by the application.
Rust libraries are called crates.
When you build the project, Cargo automatically downloads these crates from the Rust package registry.
For example, the Weather App uses several important crates.
GTK4
gtk4 = "0.9"
This crate provides Rust bindings for the GTK4 graphical user interface toolkit.
It allows us to create windows, buttons, labels, and other interface elements.
Libadwaita
libadwaita = { version = "0.7", features = ["v1_4"] }
Libadwaita provides modern GNOME interface components.
Widgets such as:
HeaderBarNavigationSplitViewStatusPageActionRow
come from this library.
These widgets help create applications that follow GNOME design guidelines.
reqwest
reqwest = { version = "0.11", features = ["blocking", "json"] }
The reqwest crate is used to send HTTP requests.
In this Weather App, it is used to fetch weather data from the Open-Meteo API.
The enabled features allow the program to:
- Send requests easily (
blocking) - Automatically handle JSON responses (
json)
serde
serde = { version = "1.0", features = ["derive"] }
The serde crate is used to convert JSON data into Rust data structures.
Weather APIs usually return data in JSON format. Serde allows the application to easily convert this data into Rust variables.
urlencoding
urlencoding = "2.1"
This crate ensures that city names are correctly formatted when used in web requests.
For example:
New York → New%20York
This encoding prevents errors when sending requests to the weather API.
Build Dependencies
Some tools are only needed during compilation.
These are defined in the [build-dependencies] section.
[build-dependencies]
glib-build-tools = "0.18"
In the Weather App, this tool is used to compile GTK resource files such as .ui interface files.
This process is triggered by a special script called build.rs.
How Cargo Builds the Application
When you run the following command:
cargo build
Cargo performs several steps automatically.
First, it checks the dependencies listed in Cargo.toml.
Then it downloads the required crates from the Rust package registry.
After that, it compiles all crates and links them together with the project code.
Finally, Cargo produces the application executable.
The compiled files are placed in the target directory.
Running the Application
To build and run the Weather App, you can use the following command:
cargo run
Cargo will compile the project and start the application.This command is very convenient during development because it performs both steps automatically.
open the real file in the project
You can also open the file directly from the project folder:

weather-app/Cargo.toml
Creating the First Window
In this section, we will create the first graphical window of the Weather Application.
Before building the full application with a sidebar, weather panel, and API integration, we first need to confirm that GTK4 and Libadwaita are working correctly.
The goal of this step is simple: launch the application and display a basic window.
Project Structure
Your project currently looks like this:
weatherapp/
├── Cargo.toml
├── build.rs
└── src/
    └── main.rs
The main.rs file is the starting point of the program.
This is where the GTK application begins.
The file build.rs is a special Rust build script.
It is executed by Cargo before compiling the application.
The build.rs File
At this stage, you may notice that the project already contains a file called build.rs.
This file is not used to create the application window itself. Instead, it is used during the build process to prepare additional project resources.
In GTK applications, build.rs is often used later to compile files such as:
- UI definition files
- resource XML files
- icons
- other bundled application data
For now, you do not need to change anything inside build.rs to display the first window.
We include it in the project structure because it will become important in later chapters when we work with GTK resources.
A simple example of build.rs looks like this:
fn main() {
    glib_build_tools::compile_resources(
        &["resources"],
        "resources/resources.xml",
        "resources.gresource",
    );
}
This tells Rust to compile the resource files from the resources/ folder before building the application.
If your project already contains this file, you can leave it as it is.
If you do not yet have a resources folder or resource files, that is fine they will be introduced later when needed.
Basic GTK + Libadwaita Window
Replace the contents of src/main.rs with the following code.
use gtk4 as gtk;
use libadwaita as adw;

use gtk::prelude::*;

const APP_ID: &str = "com.example.WeatherApp";

fn main() {
    adw::init();

    let app = adw::Application::builder()
        .application_id(APP_ID)
        .build();

    app.connect_activate(build_ui);
    app.run();
}

fn build_ui(app: &adw::Application) {
    let title_label = gtk::Label::new(Some("Weather App"));

    let header = adw::HeaderBar::builder()
        .title_widget(&title_label)
        .build();

    let empty_content = gtk::Box::builder()
        .orientation(gtk::Orientation::Vertical)
        .build();

    let main_box = gtk::Box::builder()
        .orientation(gtk::Orientation::Vertical)
        .spacing(0)
        .build();

    main_box.append(&header);
    main_box.append(&empty_content);

    let window = adw::ApplicationWindow::builder()
        .application(app)
        .title("Weather App")
        .default_width(900)
        .default_height(750)
        .content(&main_box)
        .build();

    window.present();
}
What This Code Does
This code creates the simplest possible GTK + Libadwaita application window.
The program starts by initializing Libadwaita. This ensures that the application uses the correct GNOME styling and theme behavior.
Next, an Application object is created.
This object manages the lifecycle of the entire program, including startup, window creation, and closing the application.
When the application starts, GTK triggers the activation event.
At that moment, the function build_ui() is called to create the user interface.
Inside this function, we create two main elements.
The first element is a HeaderBar. The header bar is the top section of the application window and contains the title “Weather App.”
The second element is the ApplicationWindow. This is the main window of the program.
The window is configured with a default size of 900 × 750 pixels, which provides enough space for the future layout of the Weather App.
Finally, the window is presented so that it becomes visible to the user.
Running the Application
Open a terminal inside the project directory and run:
cargo run
Cargo will compile the project and launch the application.
Expected Result
If everything is configured correctly, you should see:
- A window titled Weather App
- A header bar at the top
- An empty content area
This confirms that GTK4 and Libadwaita are working correctly in your system.
In the next chapters, we will begin building the real interface by adding:
- The sidebar
- The city search feature
- The weather display panel
View the Complete Weather App Code
If you want to see the full working implementation of the Weather Application, you can open the original source code of the project.
You can view the main program file here:
➡ Weather App Main File
src/main.rs
You can also view the build script here:
➡ Build Script File
build.rs
This file is responsible for compiling bundled GTK resources during the build process.
By opening these files, you can explore the full implementation of the application and understand how all components work together.
Two important improvements from the feedback:
- Do not suddenly show
build.rscode under “View the Complete Weather App Code” without first explaining whatbuild.rsis. - Add one sentence like this:
You do not need to fully understand
build.rsyet; it is included here so you know where it comes from, and we will use it later when adding resources.
Layout Overview Designing the Application Structure
Before implementing logic, networking, or storage, a developer must define the user interface architecture.
This chapter explains how the Weather App layout is structured and why specific UI design decisions were made.
The focus here is not code syntax, but layout strategy and UI reasoning.
1. Purpose of the Layout
The Weather App must support:
- Desktop usage (wide screens)
- Tablet usage
- Linux mobile environments
Therefore, the UI must:
- Be responsive
- Separate navigation from content
- Avoid duplicate layouts for mobile and desktop
To achieve this, the application uses a structured layout hierarchy.
2. High-Level UI Architecture
The complete UI structure follows this hierarchy:
ApplicationWindow
    └── Vertical Layout
            ├── HeaderBar
            └── NavigationSplitView
                    ├── Sidebar (Cities)
                    └── Content Panel (Weather)
Each layer has a specific responsibility.
3. ApplicationWindow
The ApplicationWindow is the root container.
Responsibilities:
- Hosts the entire UI
- Manages window size
- Integrates with the GNOME desktop environment
- Handles breakpoints for responsiveness
This window is intentionally created with:
- A reasonable default desktop size (900x750)
- Flexibility for resizing
4. Vertical Layout Container
Inside the window, a vertical container is used.
Why vertical?
Because the interface is divided into:
- A fixed top area (HeaderBar)
- A dynamic content area (Split View)
This separation ensures that:
- The header remains stable
- Only the content area changes during navigation
5. HeaderBar (Top Navigation Layer)
The HeaderBar provides:
- Application title
- Navigation arrows (in mobile mode)
- Future action buttons (Add, Search, etc.)
Design reasoning:
- Modern GNOME applications use HeaderBar instead of traditional title bars
- It allows embedding actions directly in the top bar
- It adapts automatically to system themes
The HeaderBar does not scroll and remains constant.
6. NavigationSplitView - Core Layout Engine
The most important UI component in the layout is NavigationSplitView.
It allows:
- Two-panel layout on large screens
- Collapsible single-page layout on small screens
Desktop Mode
[ Sidebar | Weather Content ]
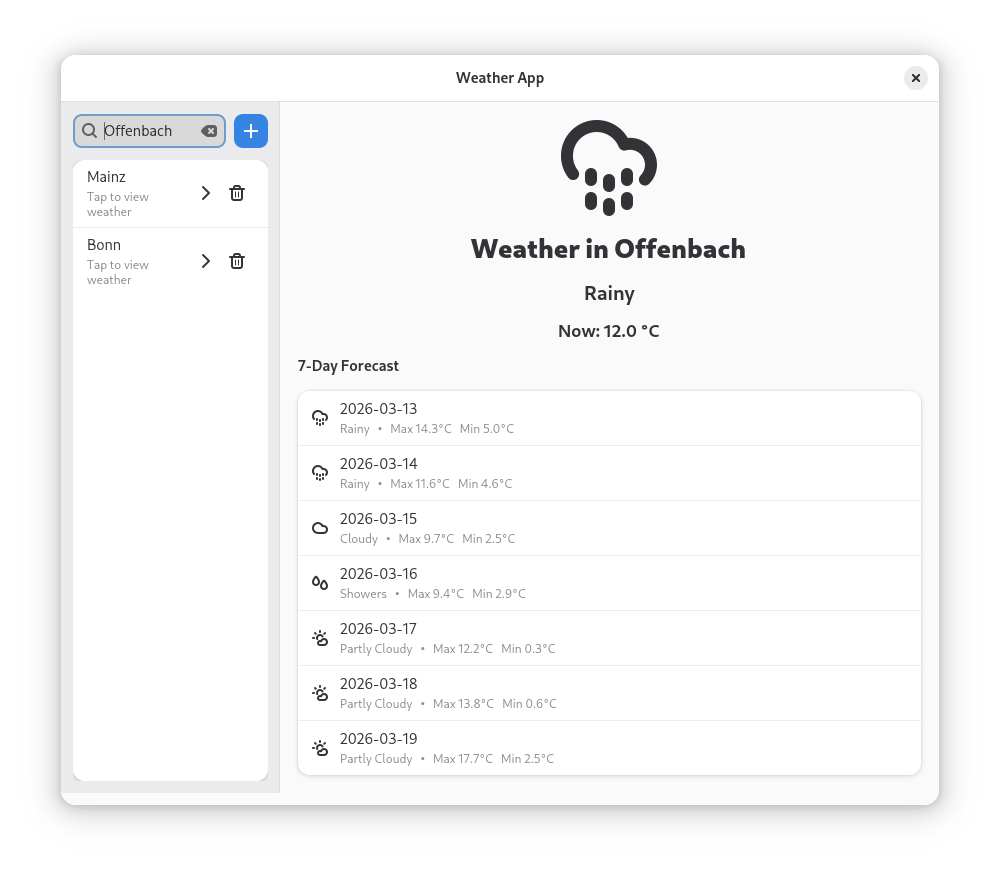
Figure: Desktop layout where the sidebar and weather content are visible at the same time.
Mobile Mode
[ Sidebar ]
   ↓ (select city)
[ Weather Content ]
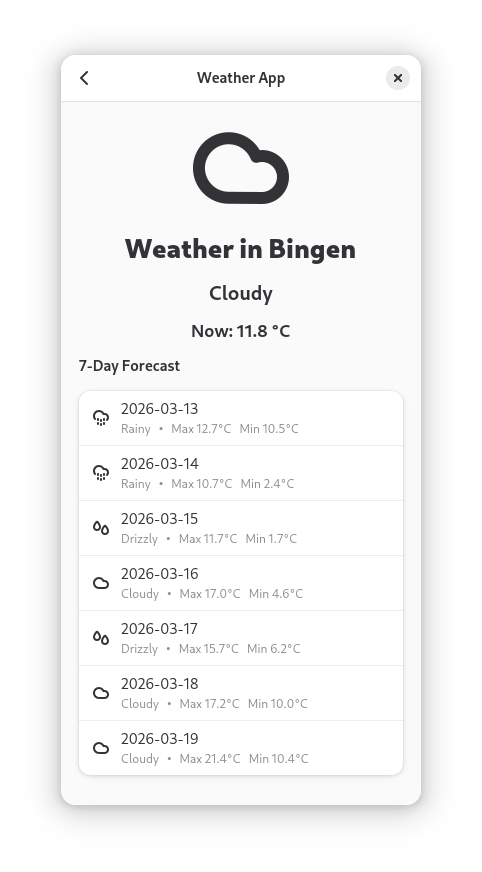
Figure: Mobile layout where only one panel is visible and navigation arrows allow switching between pages.
This eliminates the need to create separate UI files for desktop and mobile.
7. Sidebar (Navigation Panel)
The sidebar is responsible for:
- Displaying saved cities
- Providing search functionality
- Showing an empty-state message
Structurally, it contains:
- A search row (SearchEntry + Add button)
- A StatusPage (when empty)
- A scrollable list of cities
The sidebar acts as the navigation layer of the application.
It does not display weather data.
8. Content Panel (Information Layer)
The content panel displays:
- Selected city name
- Current temperature
- 7-day forecast list
It is implemented using a stack with two states:
- Empty state (no city selected)
- Weather display state
Why use a stack?
Because:
- At startup, no city is selected
- The UI should not display invalid or placeholder data
- State switching becomes clean and controlled
9. Responsive Design Strategy
Responsiveness is handled using breakpoints.
If the window width is small:
- The split view collapses
- Only one panel is visible at a time
- Navigation arrows become visible
If the window width is large:
- Both panels are visible simultaneously
- Navigation arrows are hidden
This design ensures:
- Desktop usability
- Mobile compatibility
- Consistent user experience
10. UX Design Considerations
Several user experience decisions were made:
- No weather shown before city selection
- Forward navigation disabled if no cities exist
- Clear empty-state instructions
- No duplicate "Add" buttons
- Navigation arrows only when necessary
These decisions prevent:
- User confusion
- Dead-end navigation
- Empty screens without explanation
11. Architectural Benefits
This layout design provides:
- Clear separation of concerns
- Logical UI grouping
- Expandability for future features
- Compatibility with Linux Mobile environments
- Maintainable structure for onboarding developers
It demonstrates modern GNOME application architecture using Libadwaita.
NavigationSplitView Internal Behavior and Adaptive Navigation Model
The NavigationSplitView is the architectural core of the Weather App’s interface.
This is not just a layout widget it defines how users move through the application.
1. Conceptual Model
At a high level, NavigationSplitView manages two regions:
NavigationSplitView
    ├── Sidebar (Navigation Layer)
    └── Content (Detail Layer)
These are not simple containers.
They are wrapped in NavigationPage objects to enable:
- Title handling
- Navigation transitions
- Stack-like behavior in mobile mode
Minimal structural setup looks like:
#![allow(unused)]
fn main() {
let split = NavigationSplitView::new();
split.set_sidebar(Some(&sidebar_page));
split.set_content(Some(&content_page));
}
This defines the two primary UI regions.
2. Expanded Mode (Desktop Behavior)
When the window is wide enough:
#![allow(unused)]
fn main() {
collapsed = false
}
Behavior:
- Sidebar and content are displayed simultaneously.
- Both panels share horizontal space.
- Navigation transitions are disabled.
- Back/forward arrows are hidden.
Visual layout:
[ Sidebar | Content ]
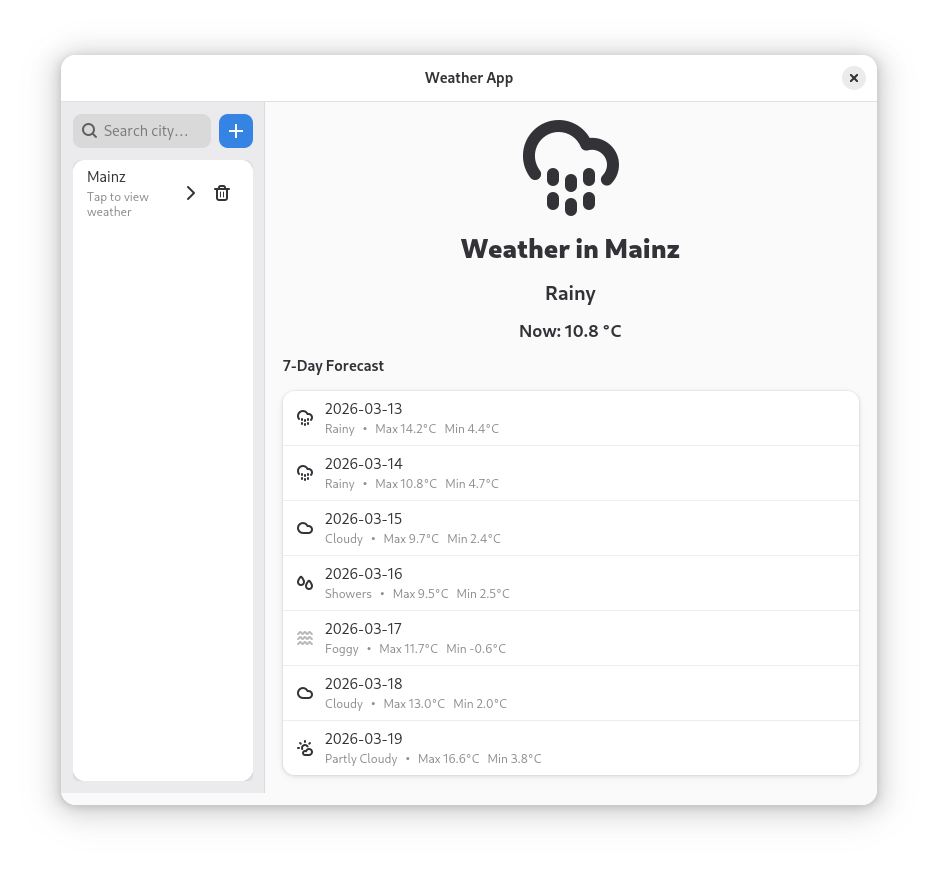
Figure: Desktop mode where sidebar and weather content are visible simultaneously.
Internally:
- Both pages are active.
- The layout engine distributes width proportionally.
show_contentproperty becomes irrelevant.
This mode optimizes:
- Efficiency
- Visibility
- Desktop multitasking
3. Collapsed Mode (Mobile Behavior)
When the window becomes narrow, the breakpoint forces:
#![allow(unused)]
fn main() {
collapsed = true
}
This fundamentally changes behavior.
Instead of a split layout, it becomes a navigation stack model.
Visual layout:
[ Sidebar ]
   ↓ select city
[ Content ]

Figure: Mobile layout where the sidebar and content appear as separate navigation pages. Internally:
- Only one page is visible at a time.
- The widget transitions between sidebar and content.
- Animations provide visual continuity.
This creates a mobile-style navigation flow.
4. The collapsed Property Explained
The collapsed property determines layout strategy.
Example of setting collapse behavior via breakpoint:
#![allow(unused)]
fn main() {
bp.add_setter(&split, "collapsed", Some(&true.to_value()));
}
Meaning:
If breakpoint condition is met → force split view into stacked mode.
Important:
Developers do not manually detect window resize events. Libadwaita handles this automatically.
This reduces complexity significantly.
5. The show_content Property Explained
When in collapsed mode, we need to control which page is visible.
This is done using:
#![allow(unused)]
fn main() {
split.set_show_content(true);
}
or
#![allow(unused)]
fn main() {
split.set_show_content(false);
}
Meaning:
false→ show sidebartrue→ show content
This property is ignored in expanded mode.
6. Navigation Flow Logic
In mobile mode:
- App starts with sidebar visible.
- User selects a city.
- Application sets
show_content = true. - Weather panel becomes visible.
Back navigation:
#![allow(unused)]
fn main() {
split.set_show_content(false);
}
This returns the user to the sidebar.
This creates predictable navigation without manual page stacks.
7. Why Not Use GtkPaned?
GTK provides GtkPaned for split layouts.
However:
| GtkPaned | NavigationSplitView |
|---|---|
| Static layout only | Adaptive layout |
| No automatic collapse | Automatic collapse |
| No stack navigation | Built-in stack model |
| Manual resize logic | Declarative breakpoint |
| Not mobile-focused | Designed for GNOME adaptive apps |
For Linux mobile onboarding, NavigationSplitView demonstrates modern best practices.
8. Interaction With HeaderBar
In collapsed mode:
- Navigation arrows appear.
- They toggle
show_content.
Example logic:
#![allow(unused)]
fn main() {
next_btn.connect_clicked(move |_| {
    split.set_show_content(true);
});
}
and
#![allow(unused)]
fn main() {
back_btn.connect_clicked(move |_| {
    split.set_show_content(false);
});
}
In expanded mode:
- Arrows are hidden.
- Both panels are visible.
- Navigation buttons are unnecessary.
This dynamic visibility improves UX clarity.
9. Internal State Model
The widget internally manages:
- Layout mode (
collapsed) - Visible page (
show_content) - Transition animations
- Page metadata (via NavigationPage)
This creates a clean separation between:
- Navigation layer (sidebar)
- Content layer (weather panel)
Developers only interact with high-level properties.
They do not manage animation stacks manually.
10. Developer Onboarding Perspective
From a learning standpoint, this widget teaches:
- Adaptive UI thinking
- Separation of concerns
- Declarative property-driven design
- Mobile-first architecture
It removes the need to teach beginners:
- Window resize signals
- Manual layout recalculations
- Complex conditional rendering
This reduces onboarding difficulty.
11. Architectural Significance for the Thesis
The use of NavigationSplitView demonstrates:
- Modern Libadwaita design patterns
- Adaptive GNOME application architecture
- A single codebase targeting desktop and mobile
- Clean UI separation
It serves as a concrete case study of:
How structured UI components reduce cognitive load in developer onboarding.
Responsive Design Adaptive Layout in GTK + Libadwaita
Modern Linux applications must work on:
- Desktop environments
- Tablets
- Linux mobile systems
Instead of writing separate layouts for each device type, the Weather App uses Libadwaita’s adaptive system.
1. What Is Responsive Design in GTK?
Responsive design means:
The interface adapts automatically depending on available window size.
Instead of detecting “desktop vs mobile”, the application reacts to actual width constraints.
This is more flexible because:
- Users can resize windows manually
- Tablets vary in size
- Desktop users may use small windows
2. The Breakpoint Concept
Libadwaita introduces the concept of a Breakpoint.
A breakpoint defines:
A condition under which a UI property should change.
In this project, the breakpoint controls whether the split view collapses.
3. Minimal Code Snippet Defining a Breakpoint
The Weather App defines a breakpoint like this:
#![allow(unused)]
fn main() {
let bp = Breakpoint::new(
    BreakpointCondition::new_length(
        BreakpointConditionLengthType::MaxWidth,
        600.0,
        LengthUnit::Sp,
    )
);
}
What this means:
- If the window width is ≤ 600sp
- Then a layout change should occur
Sp means a scalable unit that adapts better to different screen sizes and display settings.
In simple terms:
- It is not just a fixed pixel value
- It helps the interface behave more consistently across devices
- It is more suitable for adaptive UI design than raw pixels
This is why Sp is used here instead of px.
4. Applying the Breakpoint
The breakpoint is connected to the split view:
#![allow(unused)]
fn main() {
bp.add_setter(&split, "collapsed", Some(&true.to_value()));
}
This means:
When the condition is met → set collapsed = true.
So:
- Wide window → collapsed = false
- Narrow window → collapsed = true
No manual resize handling is required.
5. What Happens When Collapsed?
When collapsed = true:
- Sidebar and content are no longer shown side by side
- Only one page is visible at a time
- Navigation behaves like a stack
The visible page is controlled by:
#![allow(unused)]
fn main() {
split.set_show_content(true);
}
or
#![allow(unused)]
fn main() {
split.set_show_content(false);
}
This determines:
false→ show sidebartrue→ show content
6. Expanded Mode (Desktop)
When window width > 600sp:
- Both panels are visible simultaneously
- No navigation arrows are required
show_contentbecomes irrelevant
Layout looks like:
[ Sidebar | Weather Panel ]
Figure: Expanded desktop layout where the sidebar and weather panel are visible at the same time.
This supports efficient multitasking.
7. Collapsed Mode (Mobile)
When window width ≤ 600sp:
Layout becomes:
[ Sidebar ]
   ↓
[ Weather Panel ]
Figure: Collapsed mobile layout where only one panel is visible and navigation arrows allow switching between sidebar and content.
Only one page at a time is visible.
Navigation arrows are shown in the header bar.
This improves:
- Touch usability
- Focus
- Clarity
8. Why This Matters for Developer Onboarding
For beginners, responsive design is often complex because it typically requires:
- CSS media queries (web)
- Separate UI files
- Manual resize detection
- Conditional layout logic
Libadwaita simplifies this to:
- Define breakpoint
- Attach property change
- Let framework handle transitions
This reduces cognitive load.
New developers can focus on:
- Application logic
- Data handling
- UX decisions
Instead of fighting layout complexity.
9. UX Implications of Responsiveness
Responsive behavior in this app ensures:
- No wasted space on desktop
- No cramped interface on mobile
- Clear navigation transitions
- Consistent user experience
Additionally:
- Navigation arrows are hidden in expanded mode
- Forward navigation is disabled if no city exists
- Empty state is shown appropriately
This prevents user confusion.
10. Architectural Benefits
This design:
- Demonstrates adaptive UI principles
- Encourages modern GNOME development practices
- Aligns with Libadwaita philosophy
- Supports Linux mobile compatibility
- Keeps code maintainable
It also proves that:
A single Rust + GTK codebase can target both desktop and mobile effectively.
Sidebar Layout Structure and Design in the Weather App
The sidebar in the Weather App acts as the navigation layer of the application.
Its responsibility is not to display weather data. Instead, it manages:
- Searching for cities
- Adding new cities
- Displaying saved cities
- Showing an empty state when no cities exist
The sidebar is built as a vertical layout container.
Creating the Sidebar Container
In the Weather App, the sidebar is defined as:
#![allow(unused)]
fn main() {
let sidebar = gtk::Box::new(gtk::Orientation::Vertical, 12);
set_margins(&sidebar, 12);
}
A vertical Box is used because the elements must appear from top to bottom:
- Search row
- Empty state or city list
The spacing (12) ensures visual separation between elements.
Margins improve readability and follow GNOME spacing guidelines.
Search Row (Search + Add Button)
At the top of the sidebar, a horizontal layout is created:
#![allow(unused)]
fn main() {
let search_row = gtk::Box::new(gtk::Orientation::Horizontal, 8);

let search = gtk::SearchEntry::new();
search.set_hexpand(true);

let add_city_btn = gtk::Button::from_icon_name("list-add-symbolic");
}
This row groups:
- A
SearchEntry - A “+” button
The search field expands horizontally, while the add button stays compact.
Placing them together improves usability because:
- Search and add actions are conceptually related
- Users immediately understand where to interact The append calls also make the widget hierarchy explicit. They show that both controls belong to the same top interaction row inside the sidebar.
Empty State Using StatusPage
When no cities are stored, the sidebar displays a StatusPage:
#![allow(unused)]
fn main() {
let sidebar_empty = StatusPage::new();
sidebar_empty.set_title("Add first city");
sidebar_empty.set_description(Some(
    "Hit '+' to add a city to display the weather"
));
}
This prevents the sidebar from appearing blank.
Instead of showing an empty list, the app guides the user.
The empty state is toggled using logic like:
#![allow(unused)]
fn main() {
empty_page.set_visible(is_empty);
scroller.set_visible(!is_empty);
}
This ensures that only one of the following is visible:
- StatusPage (when empty)
- City list (when cities exist)
This improves clarity and prevents confusion.
City List Container
Saved cities are displayed inside a ListBox:
#![allow(unused)]
fn main() {
let city_list = gtk::ListBox::new();
city_list.set_selection_mode(gtk::SelectionMode::None);
}
Each city becomes an ActionRow:
#![allow(unused)]
fn main() {
let row = ActionRow::new();
row.set_title(city);
row.set_subtitle("Tap to view weather");
}
Using ActionRow provides:
- Clean GNOME styling
- Built-in title/subtitle layout
- Easy click handling
The list is placed inside a scrollable container:
#![allow(unused)]
fn main() {
let scroller = gtk::ScrolledWindow::new();
scroller.set_child(Some(&city_list));
}
This ensures the sidebar remains usable even with many cities.
Dynamic Sidebar Updates
Whenever cities change, the sidebar rebuilds:
#![allow(unused)]
fn main() {
clear_listbox(&city_list);
}
Then it re-adds rows from the updated state.
This keeps the UI consistent with stored data.
The sidebar does not directly manage weather logic. It only triggers actions when a city is selected.
Design Decisions
The sidebar follows a clear design structure:
- Top section → interaction (search + add)
- Middle section → dynamic content (empty or list)
- Scrollable list for scalability
- No duplicated add buttons
- Clear empty-state guidance
This separation makes the code easier to maintain.
It also teaches beginners:
- How to structure UI layers
- How to toggle visibility properly
- How to separate navigation from content logic
Architectural Role
Within the application hierarchy:
NavigationSplitView
    ├── Sidebar (Navigation)
    └── Content (Weather)
The sidebar acts purely as a navigation controller.
It does not fetch weather data itself. It signals which city should be displayed.
This separation improves modularity and onboarding clarity.
Search Entry City Lookup and Suggestion Popover
The search entry in the Weather App allows users to search for cities dynamically.
Instead of requiring users to type the full city name correctly, the application provides live suggestions using the Open-Meteo geocoding API. This improves usability and reduces input errors. In the sidebar, the search entry is placed together with the add city button. This means the top interaction area supports both:
- Searching for cities
- Adding a city explicitly
This keeps the interface compact and easy to understand.
Creating the Search Entry
The Weather App creates the search field like this:
#![allow(unused)]
fn main() {
let search = gtk::SearchEntry::new();
search.set_hexpand(true);
search.set_placeholder_text(Some("Search city…"));
}
SearchEntry is used instead of a normal Entry because:
- It is visually optimized for search tasks
- It includes built-in styling
- It integrates well with GNOME design patterns
The field expands horizontally to fill available space inside the sidebar.
Adding the Add City Button
Next to the search field, the Weather App creates an add button:
#![allow(unused)]
fn main() {
let add_city_btn = gtk::Button::from_icon_name("list-add-symbolic");
}
This button gives users a direct way to add a city.
Using an icon button keeps the interface minimal and matches GNOME design conventions. The plus symbol clearly communicates the purpose of the action.
Combining Search Entry and Add Button in One Row
The search entry and add button are placed together inside a horizontal layout:
#![allow(unused)]
fn main() {
let search_row = gtk::Box::new(gtk::Orientation::Horizontal, 8);

search_row.append(&search);
search_row.append(&add_city_btn);
}
This creates a single interaction row at the top of the sidebar.
The order of the append() calls is important:
search_row.append(&search);places the search field firstsearch_row.append(&add_city_btn);places the add button next to it
So the layout appears like this:
[ SearchEntry | Add Button ]
This arrangement improves usability because:
- Search and add actions are closely related
- Users can immediately see where to type
- Users can also add a city directly from the same row
The search field expands, while the add button remains compact.
Suggestion Popover Structure
When the user types, suggestions appear in a popover.
The structure is:
#![allow(unused)]
fn main() {
let suggestion_list = gtk::ListBox::new();

let suggestion_popover = gtk::Popover::new();
suggestion_popover.set_parent(&search);
suggestion_popover.set_child(Some(&suggestion_list));
}
This creates:
- A floating popover
- Attached directly to the search field
- Containing a list of suggestion rows
This avoids navigating away from the sidebar.
The suggestion UI remains lightweight and contextual.
Reacting to User Input
The Weather App listens to changes in the search field:
#![allow(unused)]
fn main() {
search.connect_search_changed(move |s| {
    let q = s.text().to_string();
});
}
Whenever the text changes:
- The current query is captured
- If the text is too short, suggestions are hidden
- Otherwise, a background request is triggered
This prevents unnecessary API calls.
Fetching Suggestions (Background Thread)
To avoid freezing the UI, the API call runs in a separate thread:
#![allow(unused)]
fn main() {
thread::spawn(move || {
    let res = fetch_geocoding_suggestions(&q_clone, 5);
});
}
This ensures:
- The UI remains responsive
- The search field does not lag
- Users can continue typing
GTK’s main thread is never blocked.
Updating the UI Safely
After receiving suggestions, the UI is updated using a timeout polling mechanism:
#![allow(unused)]
fn main() {
glib::timeout_add_local(Duration::from_millis(80), move || {
    match rx.try_recv() {
        ...
    }
});
}
This allows:
- Safe UI updates from the main thread
- Controlled checking of background results
- Smooth suggestion appearance
This design respects GTK’s single-threaded UI model.
Displaying Suggestions
When results are returned, the list is rebuilt:
#![allow(unused)]
fn main() {
clear_listbox(&suggestion_list);

for item in items {
    let row = ActionRow::new();
    row.set_title(&item.name);
    suggestion_list.append(&row);
}
}
Each suggestion:
- Is displayed as an
ActionRow - Can be clicked
- Updates the search field
- Triggers weather fetch
This keeps the interaction intuitive.
Handling No Results
If no city is found:
#![allow(unused)]
fn main() {
row.set_title("No city found");
row.set_subtitle("Try another spelling");
}
This avoids silent failure.
The user receives immediate feedback.
Why This Design Is Important
This search system demonstrates:
- Real-time UI interaction
- Safe multi-threading in GTK
- Controlled UI updates
- Clean separation between network logic and UI logic
From an onboarding perspective, it teaches:
- Event-driven programming
- Background processing in Rust
- GTK-safe UI updates
- User-friendly feedback handling
Architectural Flow
Search workflow in the Weather App:
- User types into SearchEntry
search_changedsignal triggers- Background thread calls geocoding API
- Main thread updates suggestion popover
- User selects a suggestion
- Weather fetch begins
This flow is modular and easy to follow.
City List Displaying and Managing Saved Cities
The city list in the Weather App represents the core navigation element of the sidebar.
Each saved city appears as an interactive row. When a user selects a city, the weather panel updates accordingly.
The list is dynamic and reflects the current stored data.
Creating the List Container
The list is implemented using a ListBox:
#![allow(unused)]
fn main() {
let city_list = gtk::ListBox::new();
city_list.add_css_class("boxed-list");
city_list.set_selection_mode(gtk::SelectionMode::None);
}
ListBox is used because:
- It supports vertical stacking of rows
- It integrates well with GNOME styling
- It allows interactive row behavior
The selection mode is disabled because row activation is handled manually.
Adding Cities as ActionRow
Each city is displayed as an ActionRow:
#![allow(unused)]
fn main() {
let row = ActionRow::new();
row.set_title(city);
row.set_subtitle("Tap to view weather");
row.set_activatable(true);
}
Using ActionRow provides:
- Clear title + subtitle layout
- Built-in click interaction
- Consistent GNOME visual design
The subtitle explains what happens when the row is selected.
This improves usability for new users.
Handling Row Activation
When a city row is clicked, it triggers weather fetching:
#![allow(unused)]
fn main() {
row.connect_activated(move |_| {
    start_fetch(city_name.clone());
});
}
This keeps responsibilities separate:
- Sidebar → navigation action
- Weather panel → data display
- Fetch logic → background processing
The row does not directly update UI. It only triggers the weather fetch process.
Adding Delete Button to Each Row
Each city row also contains a delete button:
#![allow(unused)]
fn main() {
let del_btn = gtk::Button::from_icon_name("user-trash-symbolic");
row.add_suffix(&del_btn);
}
The delete button:
- Is visually attached to the row
- Does not interfere with row activation
- Provides direct control over stored cities
This improves user control and flexibility.
Delete Logic
When the delete button is clicked:
#![allow(unused)]
fn main() {
cities.borrow_mut()
    .retain(|c| !c.eq_ignore_ascii_case(&city_to_delete));

save_cities_to_csv(&cities.borrow());
}
This performs two actions:
- Removes the city from the in-memory list
- Updates the CSV file for persistence
The application state and storage remain synchronized.
Rebuilding the List
After changes, the list is rebuilt:
#![allow(unused)]
fn main() {
clear_listbox(&city_list);
}
Then all current cities are re-added.
This ensures:
- UI always reflects current state
- No outdated rows remain
- Order remains consistent
Rebuilding is simple and predictable, which helps beginners understand the flow.
Interaction With Empty State
After deleting a city, the app checks whether the list is empty:
#![allow(unused)]
fn main() {
update_sidebar_empty_state(&cities, &city_list, &scroller, &empty_page);
}
If no cities remain:
- The list disappears
- The empty state becomes visible
This maintains visual consistency.
Architectural Separation
The city list handles:
- Displaying stored cities
- Triggering weather fetch
- Deleting entries
It does not:
- Fetch weather directly
- Parse JSON
- Manage threading
This separation keeps the architecture clean.
Sidebar = navigation controller Content panel = data display layer
Why This Design Is Important
This implementation demonstrates:
- State-driven UI updates
- Proper separation of logic
- Safe shared state handling (
Rc<RefCell>) - Persistence synchronization
From an onboarding perspective, it teaches:
- How UI reflects internal data
- How to manage shared mutable state in Rust
- How to connect user interaction to background processes
Empty State Guiding the User When No Cities Exist
An empty state is shown when the application has no saved cities.
Instead of displaying a blank sidebar, the Weather App uses a StatusPage to guide the user.
This improves clarity and prevents confusion during first launch.
Creating the Empty State
In the Weather App, the empty state is created like this:
#![allow(unused)]
fn main() {
let sidebar_empty = StatusPage::new();
sidebar_empty.set_title("Add first city");
sidebar_empty.set_description(Some(
    "Hit '+' to add a city to display the weather"
));
sidebar_empty.set_vexpand(true);
}
This creates a centered message inside the sidebar.
The message:
- Explains what to do
- Mentions the "+" button
- Avoids showing a useless blank space
The layout feels intentional instead of unfinished.
Why Not Show an Empty List?
If only a ListBox were shown:
- The sidebar would look broken
- Users might think something failed
- No guidance would be provided
The empty state solves this by:
- Communicating clearly
- Reducing onboarding friction
- Improving first-time experience
This is especially important for beginner users.
Toggling Between Empty State and List
The Weather App switches visibility depending on whether cities exist.
Simplified logic:
#![allow(unused)]
fn main() {
let is_empty = cities.borrow().is_empty();

empty_page.set_visible(is_empty);
scroller.set_visible(!is_empty);
}
This ensures:
- When no cities exist → show
StatusPage - When cities exist → show scrollable list
Only one element is visible at a time.
This avoids layout conflicts and overlapping widgets.
Clearing the List When Empty
When the list becomes empty, the app also clears the ListBox:
#![allow(unused)]
fn main() {
clear_listbox(&city_list);
}
This prevents:
- Old rows from remaining in memory
- Visual inconsistencies
- Incorrect state representation
The UI always reflects the real data state.
Interaction With Navigation
The empty state also affects navigation behavior.
When there are no cities:
- Forward navigation is disabled
- Content panel remains empty
This prevents the user from navigating to a meaningless weather screen.
This logic improves consistency across the entire layout.
UX Perspective
The empty state demonstrates good UI practice:
- Always explain what the user should do
- Avoid blank areas
- Provide actionable guidance
- Connect instructions to visible UI elements
Instead of overwhelming the user, the interface gently instructs them.
Architectural Role
Within the sidebar structure:
Sidebar Box
    ├── Search Row
    ├── StatusPage (if empty)
    └── City List (if not empty)
The empty state is part of the navigation layer.
It does not perform logic itself.
It simply reflects application state.
This separation keeps the design clean and maintainable.
Why This Matters for Developer Onboarding
For new developers, this feature teaches:
- How to reflect application state in UI
- How to toggle widget visibility correctly
- Why UX decisions matter in technical design
- How small improvements improve overall quality
It shows that building applications is not only about functionality, but also about user guidance.
Weather Panel and Forecast List
The Weather Panel is the right side of the Weather App. It displays the weather information for the city selected in the sidebar.
This panel has two responsibilities:
- Show the current weather conditions
- Show the 7-day forecast list
However, when the application first starts, no city is selected, so no weather data should be visible.
To handle this situation cleanly, the Weather App uses a state-based UI layout.
Managing Panel States with GtkStack
The weather panel uses a GtkStack to switch between two states.
#![allow(unused)]
fn main() {
let content_stack = gtk::Stack::new();
content_stack.set_hexpand(true);
content_stack.set_vexpand(true);
}
The stack contains two pages:
#![allow(unused)]
fn main() {
content_stack.add_named(&right_empty, Some("empty"));
content_stack.add_named(&content, Some("weather"));
content_stack.set_visible_child_name("empty");
}
These represent two possible UI states.
| State | Meaning |
|---|---|
empty | No city has been selected |
weather | Weather data is available |
When the application starts, the empty page is shown. After weather data is successfully fetched, the UI switches to the weather page.
Building the Weather Layout
Inside the weather page, the interface is built using a vertical layout container.
#![allow(unused)]
fn main() {
let content = gtk::Box::new(gtk::Orientation::Vertical, 16);
set_margins(&content, 18);
}
This container organizes the weather widgets in a vertical order.
The layout contains:
- Weather icon
- City title
- Weather description
- Current temperature
- Forecast heading
- Forecast list
Each component has a specific role in presenting the weather information.
Displaying the City Name
The selected city name is shown using a label.
#![allow(unused)]
fn main() {
let city_title = gtk::Label::new(Some(""));
city_title.add_css_class("title-1");
city_title.set_halign(gtk::Align::Center);
}
When weather data is applied, the label is updated dynamically:
#![allow(unused)]
fn main() {
city_title.set_text(&format!("Weather in {name}"));
}
This demonstrates how UI elements react to updated application data.
Showing Current Weather
The current weather is displayed using a combination of an icon, a description label, and a temperature label.
For example, the temperature label is created as follows:
#![allow(unused)]
fn main() {
let now_temp = gtk::Label::new(Some(""));
now_temp.add_css_class("title-4");
now_temp.set_halign(gtk::Align::Center);
}
When the weather fetch completes, the UI updates:
#![allow(unused)]
fn main() {
now_temp.set_text(&format!("Now: {:.1} °C", now));
}
The weather condition code returned by the API is converted into a text description and icon before being displayed.
This ensures the UI shows user-friendly information rather than raw numeric codes.
Forecast List
Below the current temperature, the Weather App displays the 7-day forecast.
The forecast is implemented using a ListBox.
#![allow(unused)]
fn main() {
let forecast_list = gtk::ListBox::new();
forecast_list.add_css_class("boxed-list");
forecast_list.set_selection_mode(gtk::SelectionMode::None);
}
The ListBox widget is suitable for this purpose because it allows multiple rows stacked vertically with GNOME styling.
Rows are not interactive, so selection mode is disabled.
Rebuilding the Forecast List
Each time new weather data is fetched, the forecast list is rebuilt.
First, existing rows are removed:
#![allow(unused)]
fn main() {
clear_listbox(&forecast_list);
}
This step is important because it prevents previous forecast entries from remaining visible.
After clearing the list, new rows are created for each forecast day.
A simplified version of the row creation looks like this:
#![allow(unused)]
fn main() {
let row = ActionRow::new();
row.set_title(&date);
row.set_subtitle(&format!(
    "{}  •  Max {:.1}°C  Min {:.1}°C",
    weather_text,
    max,
    min
));

forecast_list.append(&row);
}
Each row represents one forecast day and displays:
- the forecast date
- the weather description
- the maximum temperature
- the minimum temperature
An icon corresponding to the weather condition is also added to the row.
Where the Forecast Data Comes From
The forecast list receives its data from the weather fetch function.
The function returns structured forecast information in the form:
#![allow(unused)]
fn main() {
Vec<(String, f64, f64, i32)>
}
Each tuple contains:
- the forecast date
- the maximum temperature
- the minimum temperature
- the weather code
The UI layer simply loops through this data and creates a row for each day.
This design ensures that the UI only displays data and does not calculate it.
Applying Weather Data to the Panel
When the background fetch completes successfully, the weather panel is updated.
First, the panel switches from the empty state to the weather state.
#![allow(unused)]
fn main() {
content_stack.set_visible_child_name("weather");
}
Then the labels and forecast list are updated using the returned data.
This dynamic update ensures that the UI always reflects the latest weather information.
Handling Errors in the Panel
If an error occurs during the weather request, the panel displays an informative message.
For example:
#![allow(unused)]
fn main() {
now_temp.set_text("No city found. Try another spelling.");
forecast_label.set_visible(false);
forecast_list.set_visible(false);
}
This ensures that:
- the user sees a clear error message
- outdated forecast rows are hidden
- the interface remains consistent
Handling errors visually is an important part of creating a user-friendly application.
Expected Behavior
When the Weather App runs, the user should observe the following behavior.
At startup:
- the weather panel shows an empty state
After selecting a city:
- the city name appears
- the current temperature appears
- the weather description and icon appear
- the 7-day forecast list appears
If an invalid city is entered:
- a message is shown instead of weather data
This confirms that the panel correctly reacts to changes in application state.
Data Fetching: From City Name to Weather Forecast
The Weather Application retrieves real-time weather information from the Open-Meteo API. However, weather services typically do not accept city names directly when requesting weather data. Instead, they require geographic coordinates, specifically latitude and longitude.
For this reason, the Weather App performs the data retrieval process in two stages:
- Convert the city name into geographic coordinates using the Open-Meteo Geocoding API.
- Use those coordinates to request weather information from the Open-Meteo Forecast API.
This two-step design reflects how many modern weather systems operate and allows the application to separate responsibilities clearly.
1 Geocoding: Converting City Names to Coordinates
When a user enters a city such as:
Berlin
the weather API cannot directly use the text value. Instead, it requires precise coordinates, for example:
latitude  = 52.52
longitude = 13.41
Therefore, the application first sends the city name to the geocoding service, which translates the human-readable location into machine-readable coordinates.
Constructing the Geocoding Request
The geocoding request URL is constructed dynamically based on the user's input.
A simplified version of the request construction is shown below.
#![allow(unused)]
fn main() {
let url = format!(
    "https://geocoding-api.open-meteo.com/v1/search?name={}&count={}",
    urlencoding::encode(q),
    count
);
}
The parameters included in this request are:
name– the city entered by the usercount– the maximum number of search resultsurlencoding::encode()– ensures spaces and special characters are safely encoded for URLs
This encoding step is important because city names such as New York contain spaces that must be safely transmitted over HTTP.
Geocoding Response Models
The JSON response returned by the geocoding API is mapped into Rust structures using Serde.
#![allow(unused)]
fn main() {
#[derive(Debug, Deserialize)]
struct GeoResponse {
    results: Option<Vec<GeoCity>>,
}

#[derive(Debug, Deserialize, Clone)]
struct GeoCity {
    name: String,
    latitude: f64,
    longitude: f64,
}
}
These models mirror the structure of the API response.
Each GeoCity object contains:
- the city name
- its latitude
- its longitude
Mapping JSON data into typed Rust structures ensures that the application can work with the data safely and predictably.
Selecting the Matching City
After the geocoding request completes, the application selects the first matching city from the results.
#![allow(unused)]
fn main() {
let city0 = geo.get(0)
    .cloned()
    .ok_or_else(|| "City not found".to_string())?;
}
If a result exists, its coordinates are used. If no result is returned, the function generates an error instead of continuing with invalid data.
This prevents runtime crashes and ensures robust behavior.
2 Fetching Weather Data
Once the geographic coordinates are available, the application can request weather data from the forecast API.
The coordinates are inserted into the request URL.
#![allow(unused)] fn main() { let weather_url = format!( "https://api.open-meteo.com/v1/forecast?latitude={}&longitude={}¤t=temperature_2m,weather_code&daily=weather_code,temperature_2m_max,temperature_2m_min&forecast_days=7&timezone=auto", city0.latitude, city0.longitude ); }
This request retrieves:
- the current temperature
- the current weather condition code
- the maximum temperature for each day
- the minimum temperature for each day
- the weather condition codes for the forecast
- a 7-day forecast
The timezone=auto parameter ensures the forecast is returned in the correct local time.
Weather Response Models
The JSON returned by the weather API is also converted into Rust data structures.
#![allow(unused)]
fn main() {
#[derive(Debug, Deserialize)]
struct WeatherResponse {
    current: Option<CurrentWeather>,
    daily: Option<DailyWeather>,
}
}
The current weather model is defined as:
#![allow(unused)]
fn main() {
#[derive(Debug, Deserialize)]
struct CurrentWeather {
    temperature_2m: f64,
    weather_code: i32,
}
}
The daily forecast model is defined as:
#![allow(unused)]
fn main() {
#[derive(Debug, Deserialize)]
struct DailyWeather {
    time: Vec<String>,
    temperature_2m_max: Vec<f64>,
    temperature_2m_min: Vec<f64>,
    weather_code: Vec<i32>,
}
}
These structures allow the program to access weather values directly using Rust field names instead of manually parsing JSON.
Sending the Weather Request
The weather request is sent using the reqwest library.
#![allow(unused)]
fn main() {
let w: WeatherResponse = reqwest::blocking::get(&weather_url)?
    .json()?;
}
This code performs several actions automatically:
- Sends an HTTP request to the Open-Meteo API
- Receives a JSON response
- Converts the JSON into the
WeatherResponsestructure
This automatic conversion is handled by Serde.
Extracting Weather Information
After the JSON response is converted into Rust data, the application extracts the current weather and forecast values.
For example:
#![allow(unused)]
fn main() {
let current = w.current.ok_or_else(|| "No current weather".to_string())?;
}
This safely retrieves the current weather data while handling the possibility that the API response might be incomplete.
Similarly, the daily forecast is accessed through:
#![allow(unused)]
fn main() {
let daily = w.daily.ok_or_else(|| "No daily forecast".to_string())?;
}
The application then loops through the forecast arrays to build the data used by the user interface.
#![allow(unused)]
fn main() {
for i in 0..n {
    rows.push((
        daily.time[i].clone(),
        daily.temperature_2m_max[i],
        daily.temperature_2m_min[i],
        daily.weather_code[i],
    ));
}
}
Each entry represents one day in the forecast.
Integration with the User Interface
The data returned from the fetch function is passed to the UI layer.
The function returns structured weather information in the following format:
#![allow(unused)]
fn main() {
Ok((city0.name, current.temperature_2m, current.weather_code, rows))
}
The graphical interface then uses this data to update:
- the current weather display
- the weather icon
- the seven-day forecast list
The UI itself does not interact directly with the API. Instead, it only receives processed data from the fetch logic.
This separation improves readability, maintainability, and overall application design.
JSON Models and Error Handling
The Weather App communicates with the Open-Meteo API to retrieve weather information. The API returns data in JSON format, which must be converted into structured Rust types before the application can use it.
At the same time, network requests and external APIs may fail. Therefore, the Weather App must also implement proper error handling to avoid crashes and provide meaningful feedback to the user.
This chapter explains:
- How JSON responses are converted into Rust structs
- How the application safely handles errors during API requests
Mapping JSON Data to Rust Structures
When the Weather API returns data, the response looks conceptually like this:
{
  "current": {
    "temperature_2m": 6.3,
    "weather_code": 53
  },
  "daily": {
    "time": ["2026-03-13", "2026-03-14"],
    "temperature_2m_max": [11.8, 5.4],
    "temperature_2m_min": [5.4, 4.0],
    "weather_code": [61, 51]
  }
}
Rust cannot directly work with this raw JSON text. Instead, we define Rust structs that mirror the JSON structure.
This process is called data modeling.
Weather Response Model
The top-level JSON response is mapped into the following Rust structure:
#![allow(unused)]
fn main() {
#[derive(Debug, Deserialize)]
struct WeatherResponse {
    current: Option<CurrentWeather>,
    daily: Option<DailyWeather>,
}
}
Important details:
Deserializeallows the Serde library to convert JSON into Rust structs.Optionis used because the API may sometimes omit fields.WeatherResponseacts as the container for all weather data.
Current Weather Model
The current weather information is stored in a separate struct.
#![allow(unused)]
fn main() {
#[derive(Debug, Deserialize)]
struct CurrentWeather {
    temperature_2m: f64,
    weather_code: i32,
}
}
Field explanation:
| Field | Meaning |
|---|---|
temperature_2m | Current temperature at 2 meters above ground |
weather_code | Numeric code representing the weather condition |
The weather code is later converted into a human-readable description and icon in the user interface.
Daily Forecast Model
The seven-day forecast is represented using arrays.
#![allow(unused)]
fn main() {
#[derive(Debug, Deserialize)]
struct DailyWeather {
    time: Vec<String>,
    temperature_2m_max: Vec<f64>,
    temperature_2m_min: Vec<f64>,
    weather_code: Vec<i32>,
}
}
Each index represents one forecast day.
For example:
time[0]
temperature_2m_max[0]
temperature_2m_min[0]
weather_code[0]
Together these values describe the first day in the forecast.
This design allows the application to loop through the arrays and create the forecast rows displayed in the UI.
Converting JSON into Rust Objects
After defining the models, the API response can be automatically converted using reqwest and serde.
A simplified version of the code is:
#![allow(unused)]
fn main() {
let w: WeatherResponse = reqwest::blocking::get(&weather_url)
    .map_err(|e| format!("Weather request failed: {e}"))?
    .json()
    .map_err(|e| format!("Weather JSON failed: {e}"))?;
}
This performs several steps:
- Send an HTTP request to the weather API
- Receive a JSON response
- Convert the JSON into
WeatherResponse
After conversion, the application can safely access:
#![allow(unused)]
fn main() {
w.current
w.daily
}
No manual JSON parsing is required.
Why Option Is Important
Notice that the fields inside WeatherResponse are wrapped in Option.
#![allow(unused)]
fn main() {
current: Option<CurrentWeather>,
daily: Option<DailyWeather>,
}
This is important because:
- APIs may return incomplete responses
- network failures may produce partial data
- certain fields might be missing
Using Option prevents the application from crashing and allows missing values to be handled safely.
Error Handling in the Weather App
External API requests are not always successful. Errors may occur when:
- the user enters an invalid city name
- the internet connection fails
- the API returns incomplete data
The Weather App handles these situations using Rust’s Result type.
Returning Result from Fetch Functions
The weather fetch function returns a Result:
#![allow(unused)]
fn main() {
fn fetch_open_meteo(city: &str)
    -> Result<(String, f64, i32, Vec<(String, f64, f64, i32)>), String>
}
This means:
- Ok(...) → weather data was successfully retrieved
- Err(String) → an error occurred
Using Result forces the program to handle failures explicitly.
Handling Invalid Input
Before sending a request, the application checks whether the user entered a valid city.
#![allow(unused)]
fn main() {
if q.is_empty() {
    return Err("Empty city".into());
}
}
If the input is empty, the function immediately returns an error instead of sending an invalid API request.
Handling Missing Cities
If the geocoding API does not return a city result, the application handles it safely.
#![allow(unused)]
fn main() {
let city0 = geo.get(0)
    .cloned()
    .ok_or_else(|| "City not found".to_string())?;
}
If no matching city exists, the function returns an error rather than accessing invalid data.
This prevents crashes caused by invalid indexing.
Handling Network Errors
The HTTP request itself may fail.
For example, the internet connection might be unavailable.
The following code converts request errors into readable messages:
#![allow(unused)]
fn main() {
reqwest::blocking::get(&weather_url)
    .map_err(|e| format!("Weather request failed: {e}"))?
}
The ? operator immediately returns the error if the request fails.
This keeps the code concise and easy to read.
Handling Errors in the UI
The Weather App performs API requests in a background thread. When the request finishes, the UI checks the result.
#![allow(unused)]
fn main() {
Ok(Err(e)) => {
    show_error(e);
}
}
The UI then displays the message to the user.
For example:
#![allow(unused)]
fn main() {
now_temp.set_text(&msg);
forecast_label.set_visible(false);
forecast_list.set_visible(false);
}
This ensures:
- the user receives a clear error message
- outdated forecast data is removed
- the interface remains consistent
The application continues running instead of crashing.
Handling “City Not Found” Separately
The application also detects specific errors.
#![allow(unused)]
fn main() {
if e.to_lowercase().contains("city not found") {
    show_not_found();
}
}
This allows the UI to display a more user-friendly message when a city does not exist.
Different errors can therefore produce different UI responses.
Dialogs and User Feedback (MessageDialog)
Modern applications must not fail silently.When a user performs an invalid action, the application should provide clear feedback.
In this Weather App, we use MessageDialog from Libadwaita to inform the user when:
- The city name is empty
- The city already exists in the list
MessageDialog is a modal dialog window that appears on top of the main window. It temporarily blocks interaction with the application until the user responds.
This ensures that the user understands what went wrong.
Why We Use MessageDialog
Imagine the user clicks Add without typing anything.If nothing happens, the user becomes confused.Instead, we show a dialog that clearly explains the problem.
This improves:
- Usability
- Error handling
- User experience
- Professional interface behavior
Dialogs are part of interaction design, not just layout design.
Example: Showing a Dialog for Empty Input
Below is a simplified version of how the dialog is created in the Weather App.
#![allow(unused)]
fn main() {
let dialog = MessageDialog::builder()
    .transient_for(&parent_window)
    .modal(true)
    .heading("Empty city name")
    .body("Please enter a valid city name.")
    .build();

dialog.add_response("ok", "OK");
dialog.present();
}
What happens here
MessageDialog::builder()creates a new dialog..transient_for(&parent_window)attaches it to the main window..modal(true)blocks interaction until the dialog is closed..heading()sets the main title..body()provides the explanation message..present()displays the dialog.
The dialog now appears on top of the main window.
Example: Duplicate City Warning
If the user tries to add a city that already exists, we show another dialog:
#![allow(unused)]
fn main() {
let dialog = MessageDialog::builder()
    .transient_for(&parent_window)
    .modal(true)
    .heading("City already exists")
    .body("This city is already in your saved list.")
    .build();

dialog.add_response("ok", "OK");
dialog.present();
}
This prevents duplicate entries and maintains clean data.
How MessageDialog Fits Into the UI Structure
MessageDialog is different from layout widgets like GTK Box or NavigationSplitView.
It is not part of the permanent UI structure.Instead, it appears temporarily when needed.
So in our app architecture:
- Layout widgets structure the interface.
- Content widgets display data.
- Interactive widgets respond to actions.
- Dialog widgets provide feedback.
This completes the full interaction cycle.
What Beginners Should Understand
MessageDialog teaches an important concept:
A good application does not just display information. It communicates with the user.Handling incorrect input is part of building professional software. Even small applications should:
- Validate user input
- Inform users about mistakes
- Prevent silent failures
Adding Cities with a Modal Dialog and Validation
In the Weather App, users can add a new city using the “+” button in the sidebar. When the button is clicked, a small popup window appears asking the user to enter a city name.This popup is called a modal dialog.
A modal dialog temporarily blocks the main window until the user finishes the task. The user must either add the city or cancel the action before returning to the main interface. This design keeps the interaction simple and prevents accidental actions.
Creating the Modal Dialog
The add-city window is created using a secondary ApplicationWindow configured as a modal dialog.
#![allow(unused)]
fn main() {
let dialog = AdwWindow::builder()
    .application(&app)
    .title("Add City")
    .transient_for(&parent)
    .modal(true)
    .default_width(360)
    .default_height(160)
    .build();
}
Important parts:
transient_for(&parent)connects the dialog to the main window.modal(true)prevents interaction with the main window.- The dialog behaves like a temporary input window.
This ensures the user focuses only on entering the city name.
Adding the Input Field
Inside the dialog, a vertical layout is created.
#![allow(unused)]
fn main() {
let content = gtk::Box::new(gtk::Orientation::Vertical, 12);

let entry = gtk::Entry::new();
entry.set_placeholder_text(Some("Enter city name…"));
content.append(&entry);
}
This creates a text input field where the user can type the city name. The placeholder text helps the user understand what to enter.
Adding Action Buttons
Two buttons are added to the dialog:
#![allow(unused)]
fn main() {
let cancel_btn = gtk::Button::with_label("Cancel");
let add_btn = gtk::Button::with_label("Add");

add_btn.add_css_class("suggested-action");
}
The Cancel button closes the dialog without saving anything.
The Add button performs the main action.
The CSS class suggested-action highlights the Add button so the user can easily recognize the primary action.
Reading the User Input
When the user clicks Add, the application reads the text entered in the input field.
#![allow(unused)]
fn main() {
let name = entry.text().trim().to_string();
}
The .trim() function removes extra spaces before and after the text.
For example:
" Berlin "
becomes:
"Berlin"
This keeps the stored data clean.
Validation: Preventing Empty Input
Before saving the city, the application checks whether the input is empty.
#![allow(unused)]
fn main() {
if name.is_empty() {
    let msg = MessageDialog::builder()
        .transient_for(&parent)
        .modal(true)
        .heading("Empty city name")
        .body("Please enter a valid city name.")
        .build();

    msg.add_response("ok", "OK");
    msg.present();
    return;
}
}
If the user tries to submit an empty value, a message dialog appears. The dialog informs the user that a valid city name must be entered. This prevents invalid data from entering the application.
Validation: Preventing Duplicate Cities
The application also checks whether the city already exists.
#![allow(unused)]
fn main() {
if cities.borrow().iter().any(|c| c.eq_ignore_ascii_case(&name)) {
    let msg = MessageDialog::builder()
        .transient_for(&parent)
        .modal(true)
        .heading("City already exists")
        .body("This city is already in your list.")
        .build();

    msg.add_response("ok", "OK");
    msg.present();
    return;
}
}
Here the function eq_ignore_ascii_case compares city names without considering uppercase or lowercase letters.
This means:
"Berlin""berlin"
are treated as the same city. This keeps the city list clean and prevents duplicates.
Saving the City
Only after passing the validation checks is the city stored.
#![allow(unused)]
fn main() {
cities.borrow_mut().push(name);

save_cities_to_csv(&cities.borrow());

rebuild_list();

dialog.close();
}
These steps perform the following actions:
- Add the city to the in-memory list
- Save the list to the CSV file
- Refresh the sidebar city list
- Close the dialog
This ensures the UI and stored data remain synchronized.
Why This Design Is Important
Using a modal dialog with validation helps maintain a clean and reliable application.
It ensures that:
- users focus on one task at a time
- invalid input is prevented
- duplicate data is avoided
- the application state remains consistent
This pattern is commonly used in many desktop applications.
What Freshers Learn from This
This implementation helps beginners understand several important concepts:
- creating secondary windows in GTK
- connecting dialogs to a parent window
- reading user input from widgets
- validating input before saving data
- updating the UI after user actions
In the Weather App, the modal dialog collects the city name, validates it, updates the application state, and then closes. This demonstrates how user interaction, validation, data storage, and UI updates work together in a Rust + GTK application.
CSV Storage and Persistence
The Weather App allows users to save cities such as Berlin, Munich, These cities should remain available even after the application is closed.
To achieve this, the Weather App stores city names in a simple CSV file.
Instead of using a database, the app uses a lightweight text file. This makes the storage system easy to understand and implement, especially for beginners.
CSV File Structure
The storage file is defined using a constant:
#![allow(unused)]
fn main() {
const CSV_FILE: &str = "saved_cities.csv";
}
This file stores one city per line.
Example:
Berlin
Munich
Paris
There are no commas or extra columns. Each line simply represents one city name.
This simple structure makes the file:
- easy to read
- easy to debug
- easy to edit manually if needed
Why a Simple CSV Design Is Used
The Weather App only needs to store city names.
It does not store:
- latitude
- longitude
- timestamps
- weather data
These values are fetched dynamically from the weather API when needed. Because of this, a simple text file is enough. This design helps beginners understand persistence without needing databases or complex file formats.
In-Memory Storage
While the application is running, the cities are stored in memory using a vector:
Vec<String>
Example:
["Berlin", "Munich", "Paris"]
This vector is the main working data structure used by the application.
The CSV file is only used to save and restore this data when the app starts or closes.
Loading Cities When the App Starts
When the Weather App starts, it reads the CSV file and loads the cities into memory.
#![allow(unused)]
fn main() {
fn load_cities_from_csv() -> Vec<String> {
    if !Path::new(CSV_FILE).exists() {
        return vec![];
    }

    let Ok(text) = fs::read_to_string(CSV_FILE) else {
        return vec![];
    };

    let mut out = Vec::new();

    for line in text.lines() {
        let city = line.trim();

        if !city.is_empty() &&
           !out.iter().any(|c| c.eq_ignore_ascii_case(city)) {
            out.push(city.to_string());
        }
    }

    out
}
}
This function performs several steps. First, it checks if the file exists. If the file does not exist, the application simply starts with an empty list. Next, the file is read as plain text. Each line represents a city. The function removes extra spaces and avoids duplicates before adding cities to the vector. At the end, the function returns the list of cities stored in memory.
Saving Cities After Changes
Whenever a user adds or removes a city, the CSV file must be updated.
The Weather App saves the cities using this function:
#![allow(unused)]
fn main() {
fn save_cities_to_csv(cities: &Vec<String>) {
    let mut buf = String::new();

    for c in cities {
        buf.push_str(c);
        buf.push('\n');
    }

    let _ = fs::write(CSV_FILE, buf);
}
}
This function converts the vector of cities into plain text. Each city is written on its own line. The entire file is rewritten every time the list changes. This approach keeps the logic simple because the file always matches the current state of the vector.
How Storage Works in the Weather App
The Weather App follows a simple data flow.
1. Application Start
The CSV file is read and converted into a vector.
CSV file → Vec<String>
2. User Adds or Removes Cities
The vector is updated.
Vec<String> updated
3. File Is Updated
The vector is written back to the CSV file.
Vec<String> → CSV file
This means:
- The vector in memory is the active state
- The CSV file only stores the data permanently
Connection to the Sidebar
The sidebar list in the Weather App displays the cities stored in the vector.
When a user adds a city:
- The city is added to the vector
- The CSV file is updated
- The sidebar list is rebuilt
When a user deletes a city:
- The city is removed from the vector
- The CSV file is updated
- The sidebar refreshes
This keeps the UI and storage synchronized.
Why This Design Is Good for Beginners
This storage system is intentionally simple.
It teaches beginners how persistence works without introducing complex technologies.
From this example, a beginner learns how to:
- store application data in a file
- read file content at startup
- keep data in memory using vectors
- update the file when data changes
The storage logic is also separated from the UI logic. The CSV functions only handle reading and writing data. They do not interact with GTK widgets.
Threading and Safe UI Updates
When the user searches for a city in the Weather App, the application sends a request to the Open-Meteo API to fetch weather data.
Network requests take time. If the request runs directly in the GTK main thread, the entire UI will freeze until the response arrives.
To prevent this, the Weather App uses background threads.
Why Threading Is Needed
GTK applications run using a single main UI thread.
This thread is responsible for:
- drawing the window
- updating widgets
- processing clicks
- handling events
If a slow operation runs on this thread, the UI cannot update.
For example:
#![allow(unused)]
fn main() {
let result = fetch_open_meteo(&query);
}
If this code runs directly when a button is clicked, the application will freeze until the network request finishes.
During this time:
- the window cannot be resized
- buttons do not respond
- the interface appears stuck
To avoid this problem, long operations must run in separate threads.
Running the Weather Request in a Thread
The Weather App runs the API request inside a background thread using Rust’s thread::spawn.
#![allow(unused)]
fn main() {
let (tx, rx) = mpsc::channel();

thread::spawn(move || {
    let res = fetch_open_meteo(&query);
    let _ = tx.send(res);
});
}
This code does three things:
- Creates a channel (
tx,rx) for communication - Starts a new background thread
- Runs the weather request inside that thread
When the request finishes, the result is sent back through the channel.
Because the network request runs in another thread, the UI remains responsive.
Why the move Keyword Is Used
The thread uses this closure:
#![allow(unused)]
fn main() {
move || {
    ...
}
}
The move keyword transfers ownership of variables into the thread.
This is required because the thread may run longer than the current scope. Rust prevents unsafe borrowing by forcing the data to be moved into the thread.
Sometimes data must be cloned before spawning the thread:
#![allow(unused)]
fn main() {
let q_clone = query.clone();
}
Then q_clone is moved into the thread.
This prevents data races and keeps memory safe.
Why Channels Are Used
Background threads should not update GTK widgets directly.
GTK requires all UI updates to happen on the main thread.
So the worker thread only sends the result:
#![allow(unused)]
fn main() {
tx.send(res);
}
The main thread receives the data and updates the UI safely.
This separation prevents crashes and undefined behavior.
Receiving the Result in the Main Thread
To receive results safely, the Weather App checks the channel using:
#![allow(unused)]
fn main() {
glib::timeout_add_local(Duration::from_millis(80), move || {
    match rx.try_recv() {
        ...
    }
});
}
This function runs inside the GTK main event loop.
It periodically checks:
- whether the background thread has finished
- whether new data is available
If data is ready, the UI can be updated.
If not, the loop continues waiting.
This approach keeps the interface responsive.
Updating the UI Safely
When the result is received, the main thread updates the interface.
Example:
#![allow(unused)]
fn main() {
apply_weather(name, now, rows);
}
Inside that function, widgets are updated:
#![allow(unused)]
fn main() {
city_title.set_text(&format!("Weather in {name}"));
now_temp.set_text(&format!("Now: {:.1} °C", now));
}
This is safe because it runs in the GTK main thread.
The worker thread never touches UI widgets directly.
Handling Errors
If the weather request fails, the UI can also show an error message.
Example:
#![allow(unused)]
fn main() {
show_error(e);
}
This may update labels or hide forecast widgets.
Again, this happens only in the main thread.
Architecture of the Weather Fetch System
The Weather App separates responsibilities clearly:
User searches city
        ↓
Background thread fetches weather
        ↓
Result sent through channel
        ↓
Main GTK thread receives data
        ↓
UI is updated
Each component has a single responsibility:
- Thread → performs slow work
- Channel → transfers data safely
- Main thread → updates the UI
This architecture keeps the application stable and responsive.
What Freshers Should Learn
From this design, beginners learn several important ideas:
- GTK uses a single UI thread
- Slow operations must run in background threads
- Rust threads are created using
thread::spawn - The
movekeyword transfers ownership safely - Threads communicate using channels
- UI updates must happen only in the main thread
Flatpak Packaging and Sandbox Model
To distribute the Weather App in a clean and reliable way, the application is packaged using Flatpak. Flatpak uses a manifest file that explains how the application should be built, which runtime environment it needs, and what permissions it requires.
In this project, the manifest file is named:
com.example.Weather.yaml
This file works like a build instruction file. It tells Flatpak how to build the Rust project, which GNOME environment should be used, and how the application should run inside a sandbox.
Flatpak is very useful for GTK4 and Libadwaita applications because it provides the same runtime environment on every Linux system. This means the Weather App does not depend on the libraries installed on the user’s computer. Instead, it runs in a controlled environment defined by the manifest.
Why Flatpak Is Used
During development, the Weather App can be run using:
cargo run
In this case, the program uses the local system libraries. This is convenient for development, but it can cause problems when the project is moved to another computer.
For example, another system might have:
- a different GTK version
- missing dependencies
- incompatible libraries
Flatpak solves this problem by packaging the application with a fixed runtime environment.
For the Weather App, Flatpak ensures that:
- the correct GNOME runtime is used
- Rust compilation works correctly
- the application can access the internet for API requests
- the application can store user data such as
saved_cities.csv
Because of this, Flatpak is a good solution for distributing GTK applications.
The Flatpak Manifest File
The main file used for packaging is:
com.example.Weather.yaml
This manifest file defines:
- the application identity
- the runtime and SDK
- the Rust extension
- the build commands
- the project source
- the permissions given to the application
In simple terms, this file tells Flatpak everything needed to build and run the Weather App.
Application Identity
At the top of the manifest file, the application ID is defined:
id: com.example.Weather
This ID uniquely identifies the application in the Flatpak system.
The ID is important because it connects to:
- desktop integration
- installation directories
- the sandbox identity of the application
It should be the same or very similar to the application ID used inside the GTK application code.
Runtime and SDK
The runtime and SDK define the environment used to build and run the application.
runtime: org.gnome.Platform
runtime-version: '49'
sdk: org.gnome.Sdk
The runtime provides the libraries needed when the application runs. For GTK applications, this includes GTK, Libadwaita, and other system libraries.
The SDK provides the development environment. It includes:
- compilers
- development tools
- build dependencies
So the runtime is used when the app runs, and the SDK is used when the app is built.
This makes sure the Weather App works the same on every system.
Rust SDK Extension
Since the Weather App is written in Rust, the build environment also needs the Rust compiler.
This is added with the Rust SDK extension:
sdk-extensions:
  - org.freedesktop.Sdk.Extension.rust-stable
This extension provides:
- the Rust compiler
- Cargo package manager
inside the Flatpak build environment.
Without this extension, commands like cargo build would not work during the Flatpak build process.
Build Commands
The build process is defined inside the modules section of the manifest.
The Weather App is built using Cargo:
build-commands:
  - cargo build --release --verbose
  - install -Dm755 target/release/weatherapp /app/bin/weatherapp
The first command compiles the Rust project in release mode.
The second command copies the compiled program into:
/app/bin/weatherapp
Inside Flatpak, /app/bin is the standard location for application executables.
This step turns the Rust project into an installable application inside the Flatpak environment.
Source Definition
The manifest also defines the project source:
sources:
  - type: dir
    path: .
This tells Flatpak to use the current project directory as the source.
Flatpak copies the project files into its own isolated build environment and then runs the build commands there.
This helps create a clean and reproducible build because the result does not depend on the developer’s local system configuration.
Permissions and Finish Arguments
Flatpak applications run inside a sandbox. By default, this sandbox blocks most system access.
The application cannot automatically access:
- the internet
- the display server
- the user’s home directory
To allow necessary features, permissions must be declared in the manifest.
These permissions are defined using finish-args:
finish-args:
  - --share=network
  - --share=ipc
  - --socket=wayland
  - --socket=fallback-x11
  - --filesystem=home
These permissions allow the Weather App to use certain system resources.
For example:
--share=networkallows internet access--share=ipcallows communication between processes--socket=waylandallows connection to Wayland display server--socket=fallback-x11allows fallback support for X11--filesystem=homeallows access to the user’s home directory
Flatpak requires developers to explicitly declare these permissions.
How This Connects to the Weather App
The Weather App runs normally with cargo run.
However, when it is packaged with Flatpak, it runs inside a sandbox environment.
This means the application cannot automatically access system resources.
Instead, everything must be declared in the manifest.
For the Weather App, this includes:
- network access to fetch weather data
- display access to show the GUI window
- filesystem access to save the CSV file containing cities
So the Flatpak manifest directly reflects the needs of the application.
Building the Weather App as a Flatpak
To make building easier, the project can include a small Makefile.
The Makefile helps automate the build process so developers do not need to type long commands manually.
The Makefile can:
- install required runtimes
- install the GNOME SDK
- install the Rust extension
- build the Flatpak package
- run the application
This makes it easier for beginners to run the project.
Step 1 - Install the Build Tool
First install the Flatpak builder tool:
sudo apt install flatpak-builder
This tool reads the Flatpak manifest and performs the build process.
Step 2 - Install Dependencies
Inside the project directory, run:
make dep
This installs the required runtimes and SDK components.
Step 3 - Build and Run the Application
Now build the application using:
make
The Makefile will automatically install the required runtimes, build the application, and run it inside the Flatpak environment.
After the build finishes, a Libadwaita window should appear.
What the Makefile Does Internally
The Makefile internally runs commands similar to the following:
flatpak install --user org.gnome.Platform//49
flatpak install --user org.gnome.Sdk//49
flatpak install --user org.freedesktop.Sdk.Extension.rust-stable//25.08
flatpak-builder --user --install --force-clean repo com.example.Weather.yaml
flatpak run com.example.Weather
These commands install the GNOME runtime, the GNOME SDK, the Rust extension, and then build and run the application.
This is useful for developers who clone the repository and want to run the application quickly.
Understanding the Sandbox Model
When the Weather App is packaged with Flatpak, it does not run like a normal application. Instead, it runs inside a sandbox.
A sandbox is an isolated environment that limits access to the system.
This improves security and stability. Even if the application has a bug, it cannot freely access sensitive system resources.
What Sandboxing Means in Practice
By default, Flatpak applications cannot:
- access the internet
- access the user’s home directory
- access many system resources
The developer must explicitly declare what the application needs.
In the Weather App, this is done using finish-args.
Network Permission
The Weather App fetches weather data from the Open-Meteo API.
To allow this, the manifest includes:
- --share=network
This permission allows the application to send HTTP requests.
Without this permission, the weather API requests would fail inside the Flatpak environment.
Display Server Access
GTK applications need access to a display server to show windows.
The Weather App includes these permissions:
- --socket=wayland
- --socket=fallback-x11
These allow the application to connect to Wayland or X11.
Without these permissions, the application window would not appear.
File System Access
The Weather App stores saved cities in a CSV file:
#![allow(unused)]
fn main() {
const CSV_FILE: &str = "saved_cities.csv";
}
To allow this file to be created and updated, the manifest includes:
- --filesystem=home
This allows the application to access the user’s home directory.
Without this permission, the application would not be able to save the CSV file when running inside Flatpak.
Why the Sandbox Model Matters
The sandbox model improves security because applications cannot access system resources unless permission is granted.
This ensures that:
- applications cannot access sensitive files automatically
- permissions are transparent
- users have better control over installed applications
- applications run in a predictable environment
The Weather App only requests the permissions it needs:
- network access for API calls
- display access for the GUI
- home directory access for CSV storage
This makes the Weather App a good beginner example of how Flatpak packaging and sandbox permissions work together.
Debugging Common Errors and Flatpak Issues
While building the Weather App, several errors may appear. These errors are normal and are part of the development process, especially when working with Rust, GTK, networking, threading, and Flatpak. Instead of memorizing solutions, it is more useful to understand why these errors occur. This section explains some common issues that beginners may encounter while developing or packaging the Weather App.
Common Application Errors - Window Appears Blank
Sometimes the application runs, but the window appears empty. This usually happens if the window is not presented or if no widget is attached to the window. In the Weather App, the window is displayed using:
#![allow(unused)]
fn main() {
window.present();
}
If this line is missing, the application runs but no window appears. Another possible issue is forgetting to attach the layout to the window:
#![allow(unused)]
fn main() {
window.set_content(Some(&layout));
}
If the content is not set correctly, the window will appear but it will be empty. A beginner should always check that:
- the window is presented
- the window has a valid content widget
UI Freezing During Weather Fetch
If the weather data is fetched directly on the main thread, the UI may freeze.
For example, this code would block the GTK UI thread:
#![allow(unused)]
fn main() {
let result = fetch_open_meteo(&query);
}
Network requests take time, and if they run on the UI thread, the interface cannot update.
In the Weather App, this is solved using a background thread:
#![allow(unused)]
fn main() {
thread::spawn(move || {
    let res = fetch_open_meteo(&query);
    let _ = tx.send(res);
});
}
This keeps the UI responsive while the weather data is fetched in the background.
If the UI freezes, the first thing to check is whether a long-running operation is blocking the main thread.
Resource or UI File Not Found
Another common error appears when GTK resources cannot be found.
For example, the program may show an error like:
The resource does not exist
This usually means the resource path does not match the configuration.
For example, if the resource prefix in resources.xml is:
<gresource prefix="/com/example/WeatherApp">
Then the UI file must be loaded using:
#![allow(unused)]
fn main() {
"/com/example/WeatherApp/weather.ui"
}
The path must match exactly. Even small differences can cause runtime errors.
Duplicate or Missing Cities
Sometimes the city list may show duplicates.
This usually happens if the CSV loading logic does not prevent duplicates.
In the Weather App, duplicates are avoided using:
#![allow(unused)]
fn main() {
!out.iter().any(|c| c.eq_ignore_ascii_case(city))
}
If this check is removed, the same city may appear multiple times.
When debugging data problems, it is helpful to check both:
- the in-memory city list
- the CSV file contents
Rust Borrowing Errors
Rust may produce compile errors related to borrowing and ownership. This can happen when using shared state like:
#![allow(unused)]
fn main() {
Rc<RefCell<Vec<String>>>
}
For example, mutation must be done carefully:
#![allow(unused)]
fn main() {
cities.borrow_mut().push(name);
}
If multiple mutable borrows occur at the same time, Rust will stop compilation. Although these errors may seem confusing at first, Rust usually provides very detailed error messages explaining the problem.
Flatpak Issues
Sometimes the Weather App works correctly with:
cargo run
but behaves differently when run inside Flatpak.
This happens because Flatpak runs the application inside a sandbox environment that restricts access to system resources.
Understanding these restrictions helps beginners debug Flatpak problems.
Network Requests Not Working
The Weather App fetches weather data using network requests such as:
#![allow(unused)]
fn main() {
reqwest::blocking::get(&weather_url)
}
If the Flatpak manifest does not include the permission:
- --share=network
the sandbox blocks internet access. The application will start normally, but the API request will fail. This is one of the most common Flatpak issues.
File Storage Not Working
The Weather App saves cities using a CSV file:
#![allow(unused)]
fn main() {
const CSV_FILE: &str = "saved_cities.csv";
}
and writes data using:
#![allow(unused)]
fn main() {
fs::write(CSV_FILE, buf);
}
Inside Flatpak, file access may fail if the filesystem permission is missing.
The manifest includes:
- --filesystem=home
Without this permission, the application cannot write to the home directory.
This may confuse beginners because the same code works perfectly with cargo run.
Runtime Version Problems
Another issue can occur if the required runtime version is not installed.
For example, the manifest may specify:
runtime-version: '49'
If this runtime is not installed, Flatpak may show an error such as:
Requested extension not installed
The solution is to install the runtime manually:
flatpak install flathub org.gnome.Platform//49
Resource Files Missing in Flatpak
Sometimes the application works locally but fails inside Flatpak with resource errors.
For example:
#![allow(unused)]
fn main() {
gtk::Builder::from_resource("/com/example/WeatherApp/weather.ui");
}
If the UI file was not compiled correctly into the resource bundle, Flatpak will not find it.
Flatpak builds the project in an isolated environment, so files must be included using compiled resources instead of relative file paths.
Application Window Appears but UI Is Incomplete
If the application window opens but some widgets are missing, the issue may be related to the runtime environment.
Flatpak runs the application using the runtime defined in the manifest:
runtime: org.gnome.Platform
If the application requires a GTK or Libadwaita feature that is not available in that runtime version, the UI may behave incorrectly. Ensuring that the runtime version matches the application requirements helps prevent this issue.
Why Debugging Is Important
Debugging is an important part of learning software development. The Weather App combines several technologies:
- Rust programming
- GTK user interface
- networking
- threading
- file storage
- Flatpak sandbox packaging
Each of these layers can introduce errors.
By understanding how these components work together, beginners can learn how to identify and fix problems more effectively. Errors are not failures. They are opportunities to understand the system more deeply and improve development skills.
Weather App Project
This Weather App was developed as part of my master thesis tutorial Developer Onboarding for LinuxMobile Platform.
The app helps beginners understand how to build a small LinuxMobile application using Rust, Libadwaita, and the Open-Meteo API.
Main Features
- Search for a city
- Show current weather
- Show 5-day forecast
- Save selected cities
- Adaptive layout for desktop and mobile
- Built with Rust and Libadwaita
Connection with the Tutorial
This Weather App is the practical example used in the tutorial. The tutorial explains the setup, user interface design, API connection, data storage, and adaptive layout step by step.
Source Code
The complete source code of the Weather App is available in a separate Codeberg repository:
[Open Weather App Source Code](https://codeberg.org/Oormila94/weather-app)
The repository contains the Rust project files, including Cargo.toml, the src folder, and the main application code used in this tutorial.